1 Introduction
3xxx aluminum alloys with manganese as a main alloying element are widely used in many applications such as container, packaging, architecture, automobile industry owing to their excellent specific strength, corrosion resistance and formability [1–3]. For improving the formability and mechanical properties of Al-3105, the best way is the grain refinement. Ultra-fine grains can be obtained by intensive plastic straining, several techniques are now available for producing high strains, including equal channel angular press (ECAP), high-pressure torsion (HPT), cyclic extrusion compression (CEC), friction stir processing (FSP), accumulative roll bonding (ARB), or a combination between these techniques [4-7].
Accumulative roll bonding (ARB) is a novel process proposed for the first time by Saito et. al. in 1998 [8,9], aims at bonding together sheets of metal in the solid-state by plastic deformation during rolling of the stacked sheets conducted at room temperature or in temperature. In response to the rolling deformation, there occurs expansion of the surfaces in contact which breaks up the surface layer or the thin film of oxides and contaminants. The normal pressure from the rolls causes extrusion of the material through the cracks and brings it within atomic distances thus resulting in bonding [10]. Processing of material by rolling above recrystallization temperature is called hot roll bonding, and at room temperature cold roll bonding, respectively. The advantage of ARB process against other high straining processes is its high productivity and the feasibility of large-sized material production. The process does not require any special machines since rolling mills are widely adopted in sheet metal production.
Ghalehbandi et al. have reported the number of documents published in the period of 1999–2018 showing that early researches were almost all devoted to the ARB of similar materials. During the interval of 2007–2010, several researchers used the ARB for bonding similar/dissimilar sheet composites. The trend continued from 2011 to 2014, with a reduction in the bonding of similar materials and an increase in the bonding of dissimilar materials with/without the addition of reinforcements. In recent years, the number of studies devoted to ARB has grown significantly, and despite the increased attention to the bonding of dissimilar materials, attention to the bonding of similar materials has not diminished [11].
Biradar et al. study the thermomechanical roll bonding and the effect of solution heat treatment on formability of ARBed of Al-6063 alloy [12]. While Maier et al. improve the formability and bendability of ARBed Al-6016 by a tailored laser heat treatment [13]. It has been demonstrated by Gashti et al. that ARB process on Al-1050, not only increases microhardness and tensile strength due to work hardening combined with grain refinement, but also increases corrosion resistance more than 5.2 times after 9 cycles ARBed sample compared to annealed sample [14]. Other efforts were spent in modelling the aspects related to ARB process by finite elements simulation [15], or to produce Al-SiC nanocomposites fabricated by hybrid ARB [16]. But the ARB process is still not deeply investigated, and very little information is available about the roll bonding of Al-3xxx alloys. Xing et al. studied the effects of number of ARB cycles on grain refinement and strengthening in ARB processed at 250°C of Al-3003 alloy, showing the increase in tensile strength (after 6 cycles) of about 1.5 times than fully-hardened (H18) 3003 commercially available alloy [17].
Hence, the purpose of the present paper is to study the feasibility of the ARB process to produce the AA3105 and its effect on mechanical and formability properties of AA3105 produced by twin roll cast. Constant rolling reduction of 50% at 573k was considered and the ARB process feasibility of occurrence bonding was investigated up to 4 ARB cycles. The micrographs of the ARBed samples were observed by optical microscopy in order to control the interface bonding layers. The ARBed samples were subjected to tensile and three-point bending tests. The tensile fracture surfaces and the outer bending surfaces after bending at 90° and 180° were investigated and discussed.
2 Experimental procedures
The material studied in this paper was AA3105 aluminum alloy whose chemical composition is reported in Table I. The original alloy, twin roll cast from liquid to 6mm in thickness, was hot rolled at 400°C to 2.8mm and then cold rolled with two passes to reach 1.2 mm of final thickness. The optical examination of the samples was conducted under conditions of polarized light. Etching was carried out electrolytically using a Baker’s solution of 5 ml HBF4 and 200 ml distilled water and a stainless-steel cathode.
The initial microstructure is characterized by elongated grains with the presence of aggregates with eutectic-like structure Al(Mn,Fe,Si) based, at the center layer as shown in Fig. 1. The sheets were cut to a final dimension of 40mm in width and 120mm in length. All the sheets were heat-treated before ARB in furnace at 400°C and air cooled to room temperature to improve ductility.
Fig. 1. Microstructure of the initial material obtained by optical (a) and SEM analysis showing the segregates elements (b) for A0 condition
Table 1. Chemical composition of AA3105 alloy (wt%)
|
Elements |
Si |
Fe |
Cu |
Mn |
Mg |
Cr |
Zn |
Ti |
Al |
|
Content |
0.23 |
0.45 |
0.11 |
0.51 |
0.70 |
0.006 |
0.01 |
0.05 |
Bal. |
2.1 Samples preparation for Roll-bonding process
Two aluminum strips with dimensions of 120 x 40 x 1.2 mm3 were degreased in acetone, wire-brushed, stacked together, fastened at both ends by thin aluminum rivets and then rolled down to 50% at 573K (see ARB scheme in Fig.2). After that, the obtained sheet was halved, and the above procedure was repeated four times. There were samples processed for 1, 2, 3 and 4 ARB cycles (n) in total, which corresponded to the accumulated von Mises equivalent strain of 0.8, 1.6, 2.4 and 3.2 (Eq.1).
The sheets were roll bonded immediately after preheating without lubrication using a two-high rolling mill (BW200, Carl Wezel, Mühlacker, Germany) to a 50% thickness reduction. The roll diameter and the peripheral roll speed averaged are 130 mm and 52 rpm, respectively, which has been kept constant for all samples.
Previous ARB tests conducted at room temperature and 200°C, gave a bad bonding between layers since the first ARB cycle. Therefore, the stacked sheets were preheated in muffle furnace from room temperature to 573K in 10 minutes before roll bonding. The time occurring between the exit from the furnace to rolling was evaluated in 2 seconds. The ARBed sheets were designed as follow: initial material “A0”, after 1 cycle ARB “A1”, and so on up to maximum 4 cycles “A4”.
Fig. 2. Schematic diagram showing the accumulative roll-bonding process
2.2 Tensile, bending and hardness tests
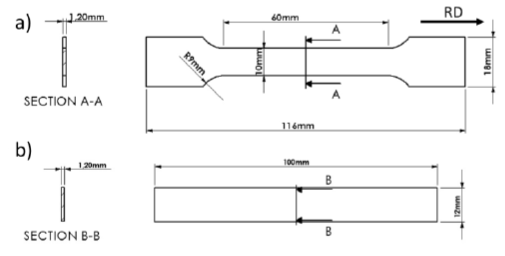
Tensile and three-point bending tests were conducted on AA3105 from zero up to four ARB cycles. Tensile test and three-point bending specimens were cut along the rolling direction of dimensions shown in Fig. 3. Mechanical tests were carried out at ambient temperature using a Galdabini Sun 500 material testing machine with HBM DD1 Displacement Transducer. For the tensile test, a nominal strain rate of 1mm/min was used according to ASTM E8M-11. During testing, the nominal stress and nominal strain data were recorded; the Ultimate Tensile Strength (UTS) and Ultimate percentage Elongation (A%) were calculated. For each ARB condition, three tensile tests were performed.
Three-point air bending was conducted according to ASTM E 290-97a on the same testing machine at a pressure head speed of 2 mm/min. The diameter of the pressure head was 10 mm, and the span was 25 mm. In this contest, forming force and the fracture occurrence of outer bending fiber were considered. Thus, all specimens were bent to the same bending angle φ of about 90 deg, and later to 180 deg. The punch force-displacement curves were recorded. For each condition, two specimens were tested, and the maximum standard deviation of punch force was 3 pct. and 4 deg in bending angle.
Both tensile fracture and three-point bent surfaces were observed by Leica MZ8 stereomicroscope, in order to analyze the fracture surface and any cracks on the outer bending fiber respectively.
Vickers Microhardness (HV) measurements were carried out with an applied load of 100gf and 10 s of dwell time, according to ASTM E-384. The samples were mechanically polished after cutting. The indentations were made over the sample surface, perpendicular to the thickness direction. The average of six measurements was taken as a hardness value for each sample.
Fig. 3. Specimens dimension for: a) tensile, and b) Three-point bending tests, machined along the rolling direction
3 Results and discussion
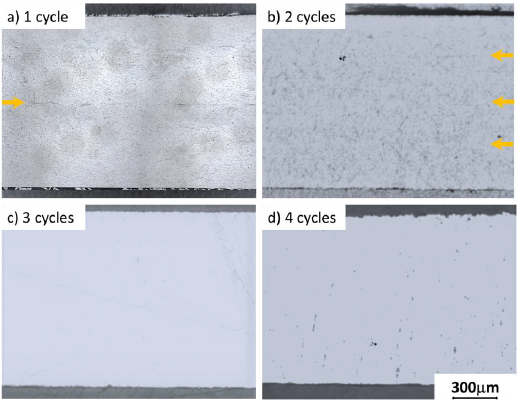
Optical macrographs of 300°C-ARBed samples of 3105 Aluminum alloy are shown in Fig. 4, in which the surface of roll bonded is roughly polished in the thickness direction. The bonding of the interfaces was very good, the interfaces introduced in the first and second cycles are seen clearly (Figs.4 a, b). It is difficult to find the interfaces of the passes after 3 and 4 ARB cycles (Figs.4 c, d). This means that the subsequent rolling after 2 cycles improves significantly the bonding of interfaces, even that of the last pass interface is absent.
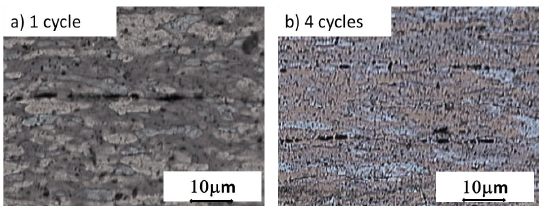
The optical micrographs of 300°C ARBed samples after 1 and 4 cycles are presented in Figs. 5a and b respectively. The microstructure presents sheared grains along the rolling direction after 1 cycle of ARB. But after 4 cycles the elongated grains were very thin, and it was difficult to distinguish the grains by simply optical microscope (Fig. 5b), small intermetallic Al6(Fe,Mn,Si) particles were observed too. Thus, indicating that grain refinements occur, and the bonding of the interfaces was good.
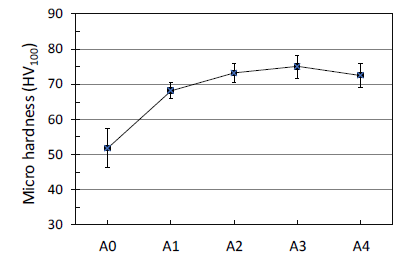
The average Vickers microhardness of Al-3105 with the number of cycles is presented in Fig. 6. The microhardness increased with increasing the cycles up to 3 cycles, to decrease slightly after 4 cycles. The maximum hardness value HV 75 was obtained after 3 ARB cycles, with 7 interfaces, is 15% higher than Al-3105 (H18) commercially alloy.
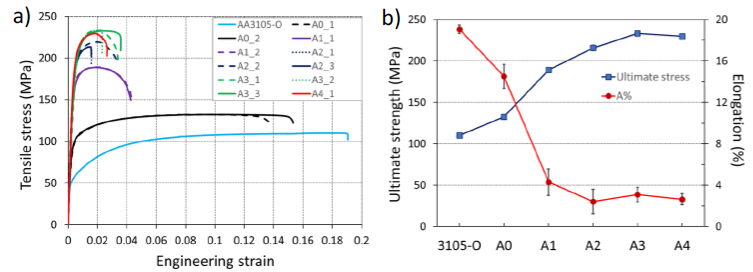
Fig. 7a shows representative engineering tensile stress-strain curves of Al-3105 in different conditions. It can be seen that the ultimate stress increases by about 30% from 132 to 190 MPa after only one ARB cycle (A1). The tendency of the UTS of the samples is nearly the same with the microhardness, it increases up to 3 cycles, after that the stress value levels off. The elongation to fracture decreased greatly after the first cycle, and then it kept at a constant level after 2 cycles (A2) as shown in Fig. 7b. However, the mechanical properties and their changing tendency of Al-3105 alloy after ARB is very similar to those in ARBed Al-3003 and Al-1100 alloys [8,9,16]. Furthermore, the ductility decrease is mainly influenced by strain hardening. The strain hardening may play the main role in strengthening up to 2 cycles (A2). From 3 cycles, the strength increase is due probably to the microstructure evolution, because the density of ultra-fine grains with high angle boundaries increases with increasing the cycles. Nevertheless, a good bonding in the interfaces formed in the last pass plays an important role in the ductility decrease.
Fig. 4. Optical macrographs of 3105 alloy after 300°C-ARB (a) 1 cycle, (b) 2 cycles, (c) 3 cycles and (d) 4 cycles
Fig. 5. Optical micrographs of 3105 alloy after 300°C-ARB (a) 1 cycle and (b) 4 cycles
Fig. 6. Variation of Vickers hardness of Al-3105 as a function of the cycles of ARB
Fig. 7. Stress-strain curves of: (a) fully homogenized and roll bonded Al-3105, (b) Ultimate strength and fracture elongation in % with increasing the cycles of ARB at 300°C
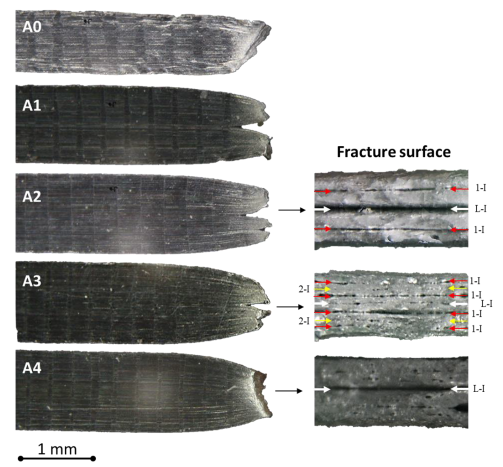
For further observing the bonding condition, the fracture surfaces, after the tensile test, were reported in Fig. 8. It shows that the initial material “A0” exhibited a typical ductile fracture showing a great deformation and necking at a macro level. After ARB process, the samples also show a ductile fracture having the dimples. But a little deformation and small necking happened. The interfaces formed in the 2 cycles and 3 cycles samples were indicated in Fig. 8. There were total 15 (24 − 1) interfaces in the 4 cycles sample so that the thickness of the initial sheets after 4 cycles was reduced to 1/24 mm (∼75μm). So, it is difficult to indicate the individual interface for A4, only the interface formed in the last pass was given in the Figure. It can be also seen that debonding happened in the interface formed in the last pass (reduction 50%). However, debonding did not happen obviously in the interfaces formed in the other passes (reduction ≥75%). The interface formed in the last pass (reduction of 50%) was not strong enough. Only after deformation with more than 75% reduction, the interfaces could bond very well. Therefore, after the final ARB pass, the materials should further be rolled with a reduction of at least 50%. In that case, all the interfaces (reduction ≥75%) are supposed to be bonded very well, and the ductility may be improved to some extent [16].
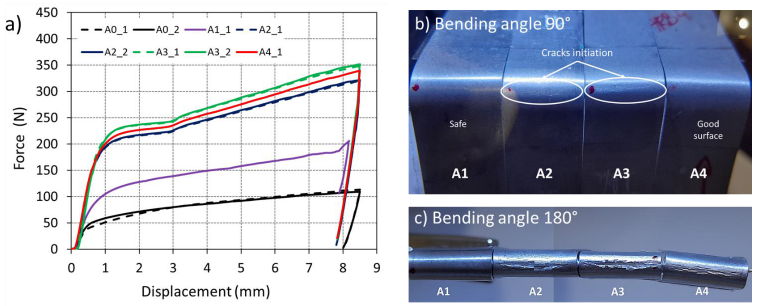
Fig. 9a shows exemplary punch force vs displacement curves during bending of initial material A0 and accumulative roll bonded samples after 1, 2, 3, and 4 cycles. Macroscopic pictures of the bending edges of all AA3105 samples bent to around 90 deg and 180 deg are shown in Fig.9b and Fig.9c respectively. While initial material A0, 1 cycle A1 and 4 cycles A4 ARBed samples can be bent up to the first testing angle of around 90 deg without cracking, A2 and A3 samples show initial crack formation in at 90 deg bending angle. Although the bendability of the accumulative roll bonded samples is clearly decreased, the necessary punch force increased significantly. The maximum punch force for this case is reached after 3 ARB cycles, the punch force steadily increases with the number of ARB cycles except for A4. Thus, confirming the results obtained by tensile and microhardness tests.
Fig. 8. Tensile fracture surfaces of 3105 alloy after 300°C- ARB. “A” subscript indicates the ARB cycle number (e.g. A3 means 3 cycles). L-I: Interface formed in the last pass, 1-I: Interface formed in the first pass, and 2-I: Interface formed in the second pass.
As described previously, all accumulative roll bonded samples were successfully bent to the maximum testing angle of 90 deg, small crack initiation was found for A2 and A3. After overbending to the second testing angle of around 180 deg, ARBed samples failed during testing, while A1, as well as A0, were successfully bent to the maximum testing angle of 180 deg. Hereby, the failure mechanism of the ARB processed specimens can be clearly observed from pictures depicted in Figs. 9b and c. During bending, a crack forms at the point of highest bending stress at the outer bending edge and propagates toward the last bond plane located in the middle of the sheet. From this point, the crack propagates in the bond plane, as here small voids and bonding faults make this direction a clearly preferred one.
Fig. 9. Exemplary punch force vs displacement of: (a) ARB processed samples, bending edges surface with φ 90° (b), and 180° (c)
4 Summary
The feasibility and the effect of ARB process on mechanical properties and formability of AA3105 aluminum alloy were investigated in the present study. The Al-3105 alloy strips were successfully roll bonded at 573k up to 4 passes, which correspond to a total strain of 3.2. The tendency of the UTS and microhardness of the samples is nearly the same, it increases up to 3 ARB cycles, after that the stress value levels off. The UTS measured after ARB3 is 235 MPa, 53% higher than the annealed condition and 18% higher than (H16) hardening condition.
The bonding of the interfaces was very good in the thickness direction, the interfaces introduced in the first and second cycles are seen until 2 cycles, after that, it is difficult to find the interfaces of the passes after 3 and 4 ARB cycles with the optical microscope, thus indicating a very good bonding. The bendability ⊥ to rolling direction is good up to bending angle of 90 deg, even cracks onset was observed at the outer edge after 2 and 3 cycles. At 180 deg bending, ARBed samples failed during testing, while A1, as well as A0, were successfully bent. A slide improvement in bendability after 3 ARB cycles was seen, this behavior can be attributed to the excellent bonding interface reached at 4 cycles, the reduction in thickness single-layer (~75µm) and, the likely increase in high angle boundaries grain density driven by grain refinement. However, further investigations are needed in order to better understand this feature.
Acknowledgements
The authors would like to thank Mr. Gianluca Marongiu for assisting with specimen preparation and Mr. Fabrizio Alba for assisting in the rolling experiments. Dr. Matteo Paci from Profilglass Spa is deeply acknowledged for providing the twin roll cast alloy.


