1 Introduction
As a result of increasing globalization and rising quality requirements, the steel and metal processing industry is facing growing cost and innovation pressure to meet market demands. Not least because of their high lightweight construction potential, high-strength steel materials meet the growing material requirements of steel and metal processing, such as geometrical and dimensional accuracy in various fields of the industry, including aerospace, medical, and electrical connectivity technology. The especially narrow tolerances and dimensional accuracy required in processing high-strength wire materials present economic and ecological challenges. These are best addressed by improving the processability of high-strength steel spring materials using straightening devices with set-up assistance systems to significantly increase their potential to compete with other materials in the market. These system configurations achieve a higher amount of acceptable formed parts, reducing the quantity of rejects, thus requiring less material and financial resources. The set up assistance systems require additional information regarding material behavior during straightening as well as the straightening process in general.
Numerous publications regarding various topics of investigation of the straightening process have been conducted. To achieve a straightened steel strip, it is first necessary to correctly set up and adjust the straightening machine while its input parameters are changing, which naturally takes place while the material is uncoiled and the curvature of the steel strip changes. Therefore, it is necessary to analyze the material and its forming history as the subsequent forming behavior of the steel strip is directly linked to the state of residual stresses. Therefore [1–4] analyzed the residual stresses of the steel strip to increase the accuracy of a following finite element method (FEM) calculation. These numerical investigations are used to identify a suitable set up of the straightening roll infeed and the state of stress within the material [5–8]. But not only numerical calculations are expedient, analytical models can help as well to provide information concerning the infeed of the straightening rolls, as shown in [9–12]. [13] shows the impact that the different adjustable machine rolls have, and demonstrates that the second adjustable roll of the often used seven roll straightening machine has the most impact on curvature, and, consequently, the straightening process. In order to use the calculation results and to straighten a steel strip, an electro-mechanical automated straightening machine is required. A critical element of controlled straightening machines is the measurement system necessary to identify the curvature of the steel strip, so that the machine can adjust its roll feed.
2 Online Measurement Methods
The online measurement of the curvature of the steel strip poses a challenge in regards of the superposed tensile stress presented by the decoiling process, which leads to a straightening of the steel strip curvature. Therefore, optical and force sensor technology are unsuitable for these online measurement applications.
It is possible to measure the curvature prior to straightening and forming. Taking the declining coil radius into account, it is possible to calculate the inclining curvature. This method does not take other material defects into account like a piecewise different curvature, suggesting it would be useful to have an online measurement system.
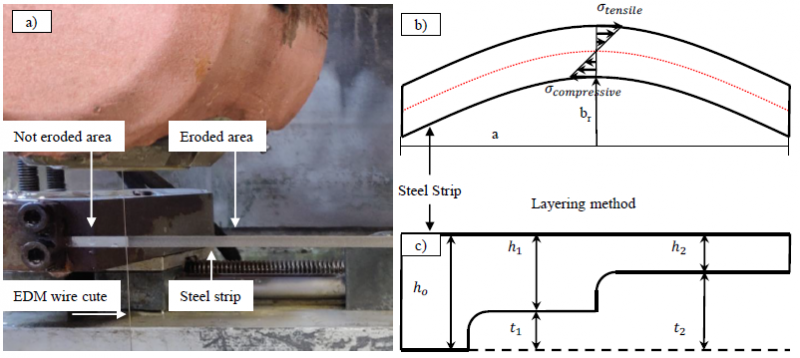
One approach is to employ magnetic induction testing. The MagnaTest D by the Foerster Group provides the set up for these tests. Magnetic induction testing depends on Faraday’s and Lenz’s rule, where a magnetic field induces eddy currents into the tested parts. The transmitter coil emits the magnetic field and in dependence of the parts magnetic field disturbance, the measuring sensor receives a phase and amplitude shifted answer. Thus, the answer of the curvature test takes place in the impedance plane. Since the amplitude and the phase shift are related to the residual stresses, it is possible to determine a change of the residual state of stress with the MagnaTest D. As shown in Figure 1 b) the curvature is directly dependent on the residual stress, thus the MagnaTest D can be used to determine the change of curvature. For this purpose, the residual stresses within the steel strip need to be investigated.
3 Residual stresses and layering method
Every specific curvature of the steel strip prompts a specific residual state of stress within the material. The measurement of the residual stress state can be achieved by various different methods, such as x-ray diffractometry, the borehole method, or the layering method [14]. In this work, the layering method was used to determine the residual stresses within the steel strip Figure 1 a) and c).
Figure 1: a) EDM wire cut process b) Geometrical values c) layering method using the EDM wire cut process
There, by reducing the thickness of the steel strip, the residual stresses are influenced and consequently, the curvature of the steel strip. The calculation of the residual stresses are shown in [15] and [16]. Here, the residual state of steel strip stress in the longitudinal direction (Figure 1 b)) is calculated with the formulas from [16], as shown below:
Where σ𝑥 stands for the residual stress depending on the depth of removed material layer, 𝐸 is the Young’s Modulus, h𝑥 is the thickness of the steel strip, 𝑎 is half of the investigated arc length (in this case 𝑎=150 𝑚𝑚), t𝑥 is the thickness of the removed layer, and 𝑏r stands for the bending arrow which corresponds to the curvature of the steel strip. The values are depicted in Figure 1 c).
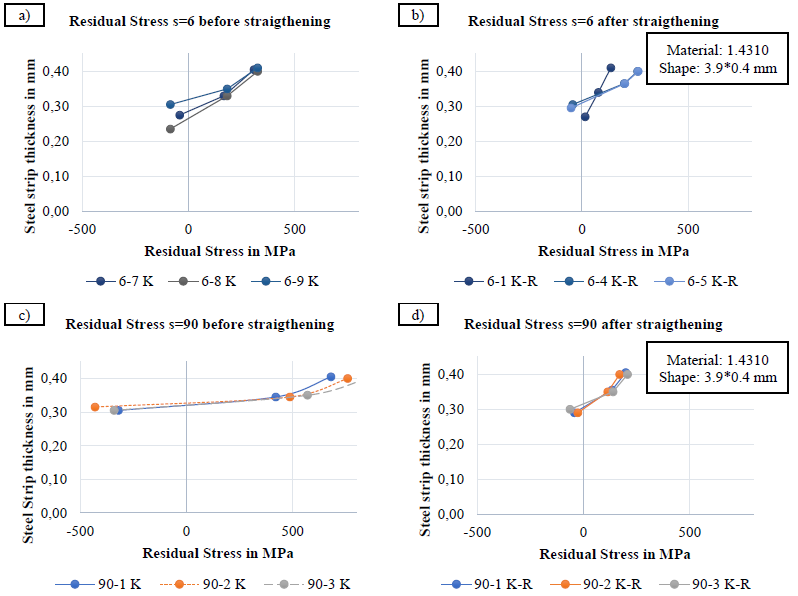
The results (three for each configuration) show that residual stress is dependent on the different emphasis of the curvature of the steel strip, as shown in Figure 2 a) and c). Thus, the curvature with 𝑏r =6 (cf. Figure 1 a)) has its maximum residual stress at its outer fiber with ≈325 𝑀𝑃𝑎, whereas the steel strip with an 𝑏r =90 has its maximum at ≈850 𝑀𝑃𝑎. There is a small scattering within the three results of each configuration of the residual stress calculations. That residual stresses are negative before crossing half of the thickness of the strip indicates that the material is not virgin in regards of manufacturing and straightening, as shown in Figure 2 a) and c).
Figure 2: Residual state of stress before a) and c) and after straigthening b) and d) with br = 6 mm a) and b) and br = 90 mm c) and d)
As the straightening process flattens the curvature of the steel strip, the maximum amplitude of the residual stress within the material is simultaneously reduced to an almost identical value, despite the former emphasis of the curvature, and the residual stress is inhomogeneously distributed over the material. This reduction of residual stresses not only leads to a higher formability, but enables the possibility of measuring the curvature of the steel strip by analyzing the change of the residual stresses, since they are distinctive due to the curvature of the steel strip as demonstrated.
4 MagnaTest D
To measure the change in curvature using MagnaTest D from the Foerster Group, the wire is uncoiled and fed through the measuring sensor. In this application, the steel strip passes the measuring sensor and subsequently follows into the straightening process. The measuring sensor is connected to the MagnaTest D evaluation unit. This unit provides the power supply and signal evaluation for the measuring coil. In order to process and evaluate the data from different measurements, the measured values are exported via a serial interface.
5 Experimental setup
To measure the change of curvature, 20 kg of 3.9x0.4 mm 1.4310 were uncoiled with the uncoil velocity set to ≈ 1.1 m/s. The material is produced with a specified bending arrow as shown in Figure 3. After approximately 670 meter the curvature of the manufactured steel strip was changed in order to test the ability of the magnetic induction measurement. To use MagnaTest D for a semi-continuous measurement, the steel strip was passed through the die in the measuring sensor. Measurement points were recorded by MagnaTest D at fixed time intervals of 1.5 seconds. This way, the continuous change in steel strip curvature was obtained over the entire coil length. The MagnaTest D is capable of measuring the material up to a few μ𝑚 below its surface, and it is assumed that the state of residual stresses of the outer fiber are crucial for the magnetic answer recorded by the measurement sensor.
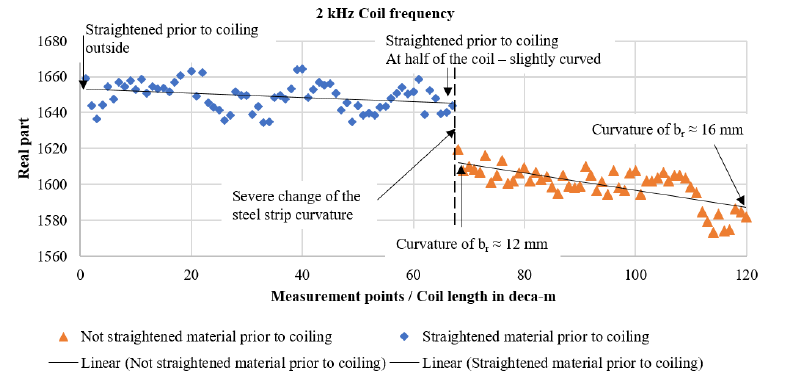
The tested steel strip specimen was divided into two parts with different curvatures. The first half of the material on the coil was an already straightened steel strip prior to the coiling process, while the other half was not straightened with a curvature where 𝑏r ≈ 12𝑚𝑚 to 𝑏r ≈ 16 𝑚𝑚.
Figure 3: Imaginary part of the Foerster MagnaTest measurement
6 Discussion
In order to measure the curvature of the steel strip, the imaginary part of the answer obtained by the measuring sensor was chosen as an example. Each point represents the mean value of 10 measured values, thus ≈1200𝑚 of steel strip were tested and measured. Figure 3 shows that for the first half of the measurement, where the material was straightened before coiling, a slight declination of the imaginary part of the measured signal can be detected. Since the steel strips radius decreases with each measurement point, the plastically deformed curvature of the steel strip increases, and with that the residual stresses rise. This slight declination indicates that the material is measurably plastically changed by the coiling process.
At measurement point 67 on the X-axis in Figure 3, there is a clear discontinuity, which is caused by a severe change of the steel strip curvature at the beginning of the material which was not straightened prior to coiling. Its curvature at the beginning is ≈12 𝑚𝑚 and at the end ≈16 𝑚𝑚. The stronger decline of the imaginary part of the measurement points trace back to the more distinct change of residual stresses due to the larger change of curvature. It is possible to link the curvature of the steel strip to the imaginary part of the received answer from the measuring sensor. Clearly, it is necessary to know the emphasis of the curvature prior to measuring in order to calibrate the received answer from the measuring sensor. Nevertheless, with this new approach it is possible to measure the curvature of the steel strip under tensile loading superposition, and thus adjust the forming rolls of the straightening machine online, according to its best benefit of straightening the steel strip.
7 Conclusion
The subject of this paper is to demonstrate the possibility of measuring the curvature of a steel strip under tensile loading superposition. Since optical and force sensors are unsuitable for this purpose, a magnetic induction testing setup was used. Magnetic induction testing is sensitive to changes in residual stresses and in this approach the residual stresses and their change links the answer that the measuring coil receives to the curvature of the steel strip.
For this purpose, the residual stresses of different steel strip curvatures were investigated. To illustrate, the residual stresses of the curvature where 𝑏r ≈ 6𝑚𝑚 and 𝑏r ≈ 90𝑚𝑚 are shown and compared to each other. The more severe the curvature the bigger the residual stresses, i.e. for 𝑏r ≈ 6𝑚𝑚 the residual stresses are at ≈325 𝑀𝑃𝑎 whereas for 𝑏r ≈ 90𝑚𝑚 the residual stresses are at ≈ 850 𝑀𝑃𝑎. Additionally, it is shown that the forming history of the steel strip is not highly relevant for the outer fiber residual stress, from which the measuring coil receives its data.
Furthermore, the MagnaTest D test results show a distinct progress of the imaginary answer. Linking this answer to a physical value, it is possible to measure the curvature of the steel strip. This approach to online measurement leads to an online set up of the straightening machine, taking the first step towards a fully automatic approach of straightening machines. This method yielded improved results compared to conventional straightening machines.


