1 Introduction
Rising costs of raw materials and manufacturing machinery are pushing manufacturers to reduce manufacturing times in order to optimize manufacturing process. In addition, reducing manufacturing waste by switching to custom part is also a path to the manufacturing economy. As materials become more efficient and therefore expensive, using only what is strictly necessary is one way to reduce costs. Custom manufacturing requires a process coupling to combine raw materials into the final product. Some of the fast manufacturing processes that have become known in recent years include press stamp forming or automated fiber placement (AFP) [1]. Both technologies are very efficient, in terms of production lead times and of the quality of the final consolidation. Generally used in the automotive industry, it is increasingly popular in the aerospace industry for structural components requiring high mechanical performance.
The development of automated fiber placement as a fast manufacturing process is significant. The first topics developed are on in-situ consolidation in order to limit the post-consolidation phase. The results of in-situ consolidation are very promising in terms of consolidation quality, percentage of porosity and final mechanical properties [2]. However, the persistent problem remains the slowness of this process. The quality of consolidation remains the parameter limiting the use of processes at their optimal speed [3]. Thus, the positioning of the work is the way to use the manufacturing processes at nominal speeds by observing the impact of the process parameters on the consolidation quality [4].
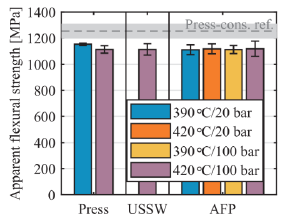
Blanks used in stamp forming process are most often perfectly consolidated blanks. Several pre-consolidation technologies are presented prior to stamp forming such as the use of a draped blank in robotic fiber placement at average speeds of about 200 mm/s to present an example of process coupling [5]. Its results are very conclusive about the consolidation of blanks after stamp forming, despite the low pre-consolidation of the blank and other issues related to the control of the evolution of defects (Fig. 1).
Fig. 1. Flexural strength of CYTEC C/PEEK (based on AS4 fibers) blanks after stamp forming [5]
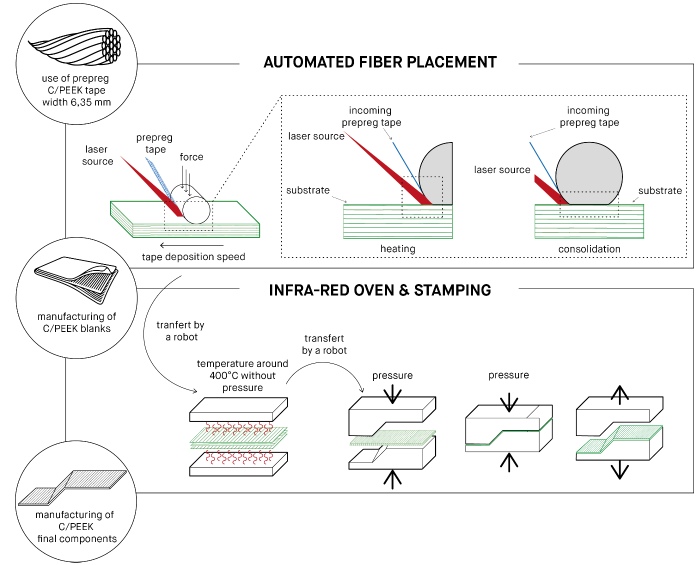
Our work focuses in continuity on process coupling to optimize manufacturing times by minimizing blank pre-consolidation before stamp forming. The postulate is to precisely define the influence of processes on the material obtained jointly and not independently throughout the manufacturing process. Previous work has shown a low porosity and a good mechanical resistance of the interface between plies [6]. This ability to create an interface with porosity after rapid APF is the first step in the development of the interlaminar contact necessary for a good consolidation quality. Fig. 2 represents the manufacturing processes studied. The development concerns the interaction between rapid AFP and stamp forming. In order to optimize the process coupling, we will therefore define in our work the interlaminar adhesion formed for higher draping speeds (>500 mm/s) [7]. The important thing is not to develop material properties but to initiate the interlaminar adhesion to allow the development of material properties during stamp forming [8].
Fig. 2. Combined processes: automated fiber placement and stamp forming
In this work, the adhesion behaviour of the blanks manufactured by rapid automated fiber placement (AFP) is characterized experimentally. The preconsolidation quality of blanks is evaluated by cross-section micrographs and thickness measurements. Additional measurements are carried out to quantify the degree of intimate contact and the content of voids formed according to the process parameters. To this end, we carried out a stamp forming test on a less consolidated blank to observe the shaping. The final objective is to connect the consolidated quality of blanks to the final components after stamp forming [9].
2 Experimental work
2.1 Blank manufacturing
Balanced [45/90/-45/0]2S blanks are produced from unidirectional Cytec APC-2 prepreg material. The prepreg has a listed consolidated ply thickness and fibre volume fraction of 0.15 mm and 59%. The glass transition temperature (Tg) and melting temperature (Tm) are respectively 143°C and 343°C.
A Coriolis Composite AFP robot with laser heating is used to produce a 400mm x 400mm laminate from 6,35 mm wide prepreg. Different speed rate, force compaction and power are applied by a deformable silicon roller of 40 SH hardness, according to the recommendations [10]. Blanks are realized by rapid AFP (>500mm/s). The study of process parameters leads to comparing the velocity of the manufacturing, the laser power, and the compaction force (Table 1). A simulation of lay-up speeds and laser powers is shown through the deposit trajectories in Fig. 3 and Fig. 4 for each blank. On the 400mm x 400mm blank surface only the 200mm x 200mm central area is constructed at the speeds recommended by the parametric tests. This cho ice is made to ensure the good grip of the prepreg tape in order to limit the tension at the beginning of each trajectory.
Fig. 3. Simulation of lay-up speeds for each blank configuration: 600mm/s; 800mm/s and 1000mm/s
Fig. 4. Simulation of laser powers for each blank configuration: 4000W; 4500W and 5000W
2.2 Taguchi’s experiment study
A set of twenty-seven blanks is produced at high-speed (>500mm/s). AFP blanks are prepared by varying the three parameters mentioned above: laser power, deposition speed and compaction roller force. Some input parameters are set to limit the number of blanks to be analyzed. The experimental design follows the Taguchi method with an orthogonal plane of the type L27 (33). The choice of the limits of the three parameters is related to the manufacturing limits of the fiber placement process. Regarding laying speeds, the minimum operating power is 4000W and the maximum operating power before damage during manufacturing is 5000W. Regarding the counting forces, the operating range extends up to 1000N. In addition, the minimum operating range of the compaction force in the literature is 500N. The third values used to balance the experimental design are intermediate values centred on the extreme ranges.
The studied answers are successively the percentage of porosity, the thickness and the degree of intimate contact at the level of the inter-ply interfaces listed in Table 1. The output parameters are studied using a methodology of specimen extraction from blank, microscopic observations and image processing.
Table 1. Taguchi’s table
|
Input parameters |
Units |
Level |
Minimal value |
Intermediate value |
Maximal value |
Output parameters |
Units |
|
Power |
W |
3 |
4000 |
4500 |
5000 |
Porosity |
% |
|
Speed |
mm/s |
3 |
600 |
800 |
1000 |
Thickness |
mm |
|
Force |
N |
3 |
500 |
750 |
1000 |
Degree of Intimate Contact |
/ |
2.3 Specimen extraction method
According to the deposit choices in Fig. 3 and Fig. 4, the extracted blank dimensions for the output parameter measurements is 200mm x 200mm. Specimen extraction methodology is adapted to limit the alteration of the structure up to microscopic observation. Therefore, blanks are cut with high power water jet using a Struers’ polisher to form specimens of 30mm x 40mm in the centre of 200mm x 200mm area. Then, they are embedded in a transparent cold resin to prevent reaction exothermic. Finally, the polishing cycle applied is shown on the Table 2. This methodology allows to observe the specimens clearly, despite the presence of porosity.
Table 2. Polishing protocol
|
Mechanical polishing |
Chemical polishing |
Ultrasonic |
||||||
|
Abrasive grain |
800 |
1200 |
2400 |
4000 |
9 μm |
3μm |
1μm |
45°C |
|
Time |
3min |
2min |
2min |
2min |
6min |
5min |
1,5min |
30min |
The microscopic observation is evaluated using an image processing software, ImageJ®. Once the image is binarized, a thresholding is performed to observe the grey scale histogram formed; three peaks are present (Fig. 5). The black one represents the porosities, the grey one represents the matrix and finally the white one represents the fibres depending on [11].
Fig. 5. Threshold according to the type of elements present in the sample: porosities (left), resin (middle) and fibers (right)
A pre-analysis is carried out to define the number of specimens to be extracted representative of the full-scale of the 200mm x 200mm blank. During this pre-analysis, the output parameter observed is the percentage of porosity being a global data at the scale of the whole blank. For this purpose, the centre of 200mm x 200mm blank is cut into sixteen specimens of 30mm x 40mm, coated, observed under a microscope and analyzed by image processing. The measurement of error with respect to the average on the porosity of all the specimens is evaluated. This way the study of a minimum of eight specimens is necessary to ensure an error of less than 5% on the measurement analyses. This conclusion is extended to thickness and degree of intimate contact measurements.
2.4 Evaluation of AFP microscopic observations
In this paragraph, the microscopic observation results of the blanks formed are evaluated regarding the porosity, the thickness and the degree of intimate contact. In a first step, the percentage of porosity is measured by comparing the ratio between the isolated pixels in the grey scale histogram and the global volume of each specimen. In the second time, four thickness measurements in the length are averaged to obtain an overall thickness of each sample.
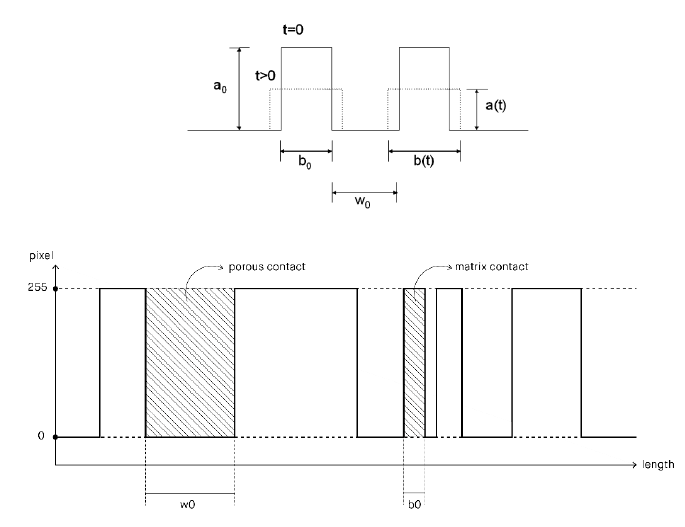
Then, the measurement of the degree of intimate contact is inspired by the work of Lee and Springer in Fig. 6 [12]. The principle is adapted to our case study. Four interfaces are studied. A line is drawn at an interface between two plies during binarized image processing. This line cuts white or black pixels. The equation of Lee and Springer (1) is then adapted: a white pixel is considered a matrix contact with the value 1 and a black pixel is considered a porous contact with the value 0. Thus, each pixel having the same dimension, the number of pixels of each entity is summed to obtain the ratio of black or white pixels to the total number of pixels.
Fig. 6. Degree of intimate contact method of Lee and Springer (top) and adaptation degree of intimate contact method (down)
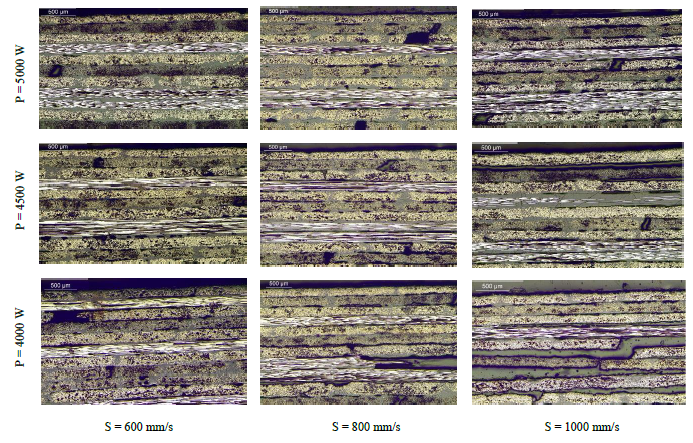
Fig. 7 shows the evolution of the blank structure as a function of the two following input parameters: the power and the speed of deposition for a given force (for example here 500N). Microscopic observations report the presence of porosities in all specimens according to the results of Table 3. The details of the porosities indicate the spatial presence of three types of porosity. The porosities related to the manufacturing process create holes in the middle of the plies [13]. While the other two types of porosities are present at the interface and in the centre of the plies. On the one hand is related to the ability of the process to create adhesion between the plies. On the other hand, they are related to the presence of porosity in the prepreg tapes used upstream of the process.
Fig. 7. Microsections of blanks according to power (P) and speed (S) parameters at a compaction force of 500N
Table 3. Output parameters results
|
Output parameters |
Units |
Minimal value |
Maximal value |
Mean |
|
Porosity |
% |
12.93 |
23.43 |
17.81 |
|
Thickness |
mm |
2.68 |
2.14 |
2.49 |
|
Degree of Intimate Contact |
/ |
0.41 |
0.87 |
0.63 |
An average of porosity of 17.81% is observed, an average well above the recommendations of the aeronautics industry for final components. Being in the realization of blank between two processes, the objective of this experimental study is to quantify defaults and not to minimize. The following section presents a pre-analysis of the effect of stamp forming on poorly consolidated blank.
3 Stamp forming specimen
A 300 tones Pinette Emidecau Industries press was used to consolidate a 400mm x 400mm laminate at a temperature 375°C and a pressure 48 bars. To confirm our hypotheses, an AFP blank is stamped following a classical consolidation cycle: closing force 30 tones, time under pressure two minutes with a tooling temperature of 220°C. Forming was carried out at 10 mm/s. The stamp forming results are also analyzed by microscopic observations. The evolution of the porosity percentage is then presented for a high-speed AFP draped blank coupled with consolidation by stamp forming.
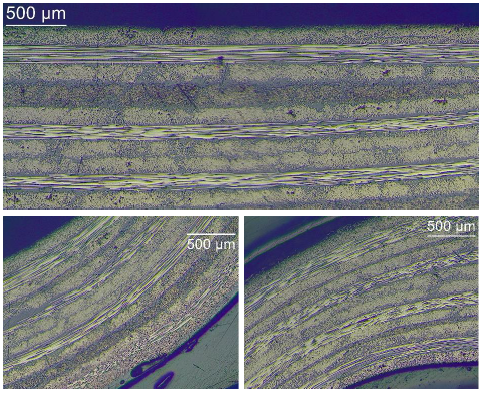
Fig. 8 shows the results of the stamp forming blank in microscopic observations. Measurements of porosity, thickness and degree of intimate contact are referenced in Table 4. The porosities still present in the thickness are mainly located in the intra-folded areas. However, the many interface and gap defects present in the blank before stamp forming are removed by the press stamp forming process.
Fig. 8. Blank specimen stamp formed
Table 4. Output parameters results after stamp forming
|
Input parameters |
Units |
Value |
Output parameters |
Units |
Value |
|
Power |
W |
4000 |
Porosity |
% |
2.13 |
|
Speed |
mm/s |
800 |
Thickness |
mm |
1.77 |
|
Force |
N |
500 |
Degree of Intimate Contact |
/ |
0.86 |
The study hypothesis then becomes more precise, justifying the use of blanks with pre-consolidation defects which are then erased. It remains to study the mechanical properties created as a result of this coupling about the properties generally obtained from the fully consolidated blanks. Complementary studies will therefore be developed to understand how the interaction of the two processes takes place on the final component. Through the predictive study of the properties obtained as a function of the input parameters used. The first results of this study are used to build a quantitative predictive model. In a first step, the predictive model is estimated the output parameters as a function of the input parameters presented above. In a second step, a second predictive study has related the parameters after stamp forming to the previously identified output parameters to create results between processes.
4 Discussion and conclusions
In this paper, the influence of rapid automated fiber placement parameters on thermoplastic composite blanks used on stamp forming process was investigated. Summarizing, the results of porosity percent, the thickness and the degree of intimate contact could be achieved. The results related to the percentage of porosity in the sample show a high porosity within the blank after a fast AFP of around 17.81%. However, the degree of porosity of fast AFP blank after stamp forming is 2.13%. An additional precision at the interface scale shows a degree of adhesion of 0.63 after rapid AFP instead of 0.86 after stamp forming. This shows an interest in the study of porosity reduction via stamp forming.
The results presented in the previous section confirm the interest of the AFP process used at high draping speeds. Several working hypotheses emerge from these first results. Knowing that the stamp forming process erases the properties of the blank, the first hypothesis focuses on the development of blank draping at high speeds. This high-speed draping is not designed to provide structure, but simply the customized stack. It is then that the stamp forming process brings during the consolidation all the mechanical properties of the assembly. The second is the low consolidation of the blank might increase interface mobility during stamp forming. No microstructure hasn’t yet been created, so there is less energy input to bring the die to its molten state.
However, defects remain present at the scale of plies in the stamp formed part. This means the defects present at the ply scale have not been able to be erased unlike the others. The base prepreg tape contained some porosities in its centre. For optimum results, no porous prepreg tapes should be used. Limiting the presence of defaults at the input of the process would make it possible to limit defaults at the output.
This preliminary data show that three responses are studied to estimate the impact of the parameters on the material: porosity, thickness and degree of contact between interfaces. A complementary study is in progress in order to link the input parameters to the output parameters. The potential relationships can be used to build a statistical predictive model. This model-based prediction allows to anticipate the output parameters of preforms draped by robotized fiber placement. A qualitative ANOVA study is first conducted in order to find significant relationships. Then, a second quantitative study by linear regression is carried out.
Finally, the coupling potential of processes; one to build a custom blank and the other to consolidate the blank; may still evolve in the decrease of production costs thanks to the increase of manufacturing speeds. The technical-economic aspect of the study could allow the reduction of the manufacturing costs of structural part with high added value.
Acknowledgements
Financial supports from Communauté d’Agglomération du Pays Basque (CAPB) fund are gratefully acknowledged. The authors would like to thank the teachers-researchers, research engineers, engineers and technical supports of ESTIA Institute of Technologies and of technology platform Compositadour for their excellent assistance in this work.
