1 Introduction
We live in a world in which the need for mobility of people and goods is constantly increasing. However, this is contrasted by the finite nature of natural resources and far-reaching changes in climate protection policy. Due to these economic and ecological requirements and the associated trend towards lightweight construction, for example through the use of high-strength and ultrahigh-strength materials, new methods and processes are essential for the production of versatile joining technologies [1]. Due to metallurgical incompatibilities and with the focus on process robustness, the use of these multi-material structures leads to conventional thermal joining technologies reaching their limits, thus mechanical joining technologies are used increasingly [2]. To increase the versatility or robustness of self-piercing riveting, a precise understanding of the process is required in order to be able to react to changing boundary conditions or product uncertainty and in long term to enable adaptive adaptation of the tools. Especially, knowledge of the influence of the rivet length on the joint is essential in order to be able to correctly adjust the joint formation. Furthermore, this in-depth understanding of the process enables the optimisation of joint formation, in particular considering process designs covering a high number of joining tasks.
2 Self-piercing riveting
Self-piercing riveting (SPR) mentioned in DIN 8593-5 is due to the reduction of thermal input, of particular interest for joining sheet metals. SPR is a one-step process to create a non-detachable joint. The entire process sequence can be divided into four stages (see Fig. 1). First, a blank holder, which encloses the rivet, fixes the parts on the die. Due to the further feed of the punch, the rivet penetrates the punch-sided sheet, creating its own pre-hole. After this, a plastic deformation of the joining part materials and the rivet takes place. Hereby the rivet spreads in the die-sided sheet. The increased application of force causes the rivet to upset resulting in the formation of an interlock. A force fit and form fit joint is created [3].
Fig 1: Tooling for SPR (left) and process sequence for self-piercing riveting and exemplary joining force-displacement curve (right) [4]
The quality of a SPR joint can be determined based on various quality-relevant characteristics (Fig. 2). Among the most important parameters are the interlock, the minimum die-side material thickness and the rivet head position. Of particular importance is a pronounced interlock between the rivet foot and the die-sided sheet, as this is largely responsible for the loadbearing capacity of the joint [3]. The flaring of the rivet can be determined by the difference between the deformed rivet diameter (df) and the initial rivet diameter (d0) according to formula (1) [4].
Fig. 2: Quality-relevant parameters of a self-piercing riveting joint [4]
With current process knowledge, it is possible to produce numerous joints. Even ultra-high-strength sheet metal joints with strengths of up to 1600 MPa can be joined by using different tool-rivet combinations [3]. Uhe et. al [5] have developed a rivet geometry, which is able to join a combination which consists of high-strength steel HCT780X on both sides as well as a combination from aluminium EN AW-5083 on the punch side and steel HCT780X on the die side. However, difficulties with the formation of joints occur especially when the currently rigid tool systems are confronted with major changes according to the boundary conditions such as the material thickness or a variation in strength and formability of the sheets. In this case, the required characteristics can no longer be guaranteed and a change of tools is necessary to ensure an optimum connection.
One way to evaluate the influence of various factors on the formation of joints is the sensitivity analysis. Sensitivity describes the response of an output variable to the change of one or more input variables. The input variables in this case include process parameters of the SPR process. Process parameters are the factors, which can be actively changed in the process, such as the geometry of the die [6]. Essential geometrical characteristics of SPR dies are the die depth and the inner die diameter. In particular, the die depth determines how much the semi-tubular rivet spreads and whether the die-side sheet metal fails [7].
The influence of different die parameters on the SPR process has been widely investigated. For instance, the influence of different die parameters on the deformation behaviour of the joining partners and the rivet was examined numerically in the investigations of Liu et al. [8] using the material combination of two AA5754 aluminium alloys. They found that a pipe die has a positive influence on the formation of the interlock and the minimum die-side material thickness. In addition, the joining force could be reduced by increasing the depth of the die. However, this can be accompanied by a negative influence on the quality-relevant characteristics. Liu et al. [9] have observed that the die parameters have a great influence on the joint formation as well as on the static strength of the SPR joints. Furthermore, conclusions on the failure behaviour could be drawn. Abe et al. [10] numerically optimised the die profile of a SPR process that an extension of the joining range of three-layer joints made of high-strength steels became possible. Based on the statistical design of experiments, Han et.al. [11] have carried out a numerical investigation on the influence of nine different die specifications on the joint formation. With the help of an optimised die geometry, a significant improvement of the quality-relevant characteristics and thus of the joint formation could be achieved. Jäckel et al. [12] could prove in their investigation that the die depth has the greatest influence on the formation of the joint. In addition, variations in sheet thickness can lead to variations in the formation of the joint.
As the studies mentioned show, the use of sensitivity analysis is indispensable to generate an extended process understanding. Therefore, the influence of various process parameters, in particular the die geometry, have already been investigated. It was shown that by changing the die geometry, the flexibility of the SPR process could be increased to be able to react to changing boundary conditions. However, the influence of a changed rivet length has not been examined so far. Especially the influence of the upsetting of the rivet and the penetration of the rivet into the die-sided sheet is unknown [4]. In order to extend the versatility of the SPR process an in-depth understanding of the process including changing rivet length is required. Based on a high level of process understanding, it is possible to further develop the SPR process by means of new rivet geometries or a modified tool actuation.
3 Experimental details
For the investigation, a typical joint in automotive engineering of two 6xxx aluminium sheets of thickness 1.5 mm and 2.0 mm in T4 condition with a standard steel C-rivet hardness H4 is used. The material properties of the aluminium material and the rivet can be taken from Table 1.
Table 1: Chemical composition and mechanical properties of EN AW 6014 [14] and semi-tubular rivet [15] used
To verify the quality of the results, the simulation studies were compared with experimentally prepared samples. To create these samples, square sheets with the dimensions 45 mm x 45 mm were processed with the TOX® TE-X system. The specifications of this system can be seen in Fig. 3
Fig. 3: Specifications of the joining TOX® TE-X system used
4 Simulation model
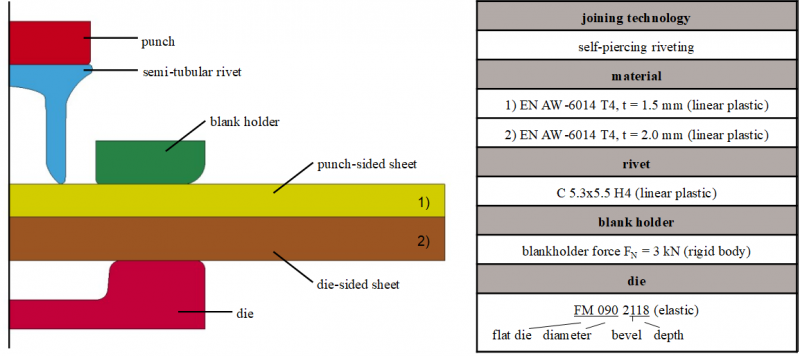
For the numerical investigation of the process parameters of the SPR process, a 2D axisymmetric simulation model was built in the LS-Dyna simulation software, see Fig. 4.
Fig. 4: Simulation model of the self-piercing riveting process
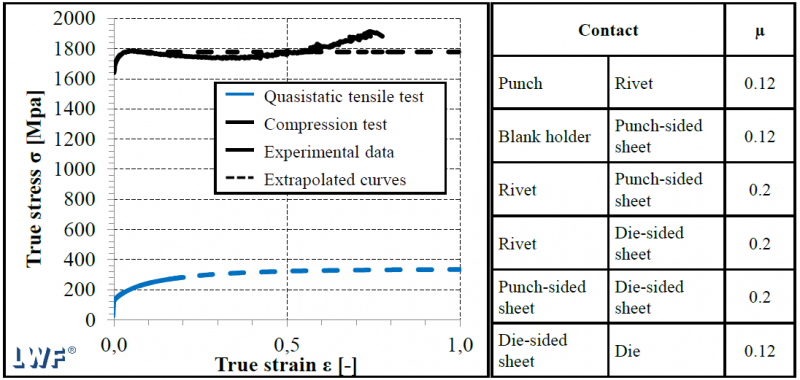
The sheet metal was modeled using tabulated Johnson Cook material model. The deformation behavior was modeled by applying the true stress versus true strain curve. Plastic influences and strain rate dependency was not defined. The rivet was modeled using an elasto-plastic material model. In order to reproduce the deformation behavior of the rivet, again the flow curve of true stress versus true strain was implemented (see Fig.5, left). The tools were modelled as rigid bodies. To form the joint, a flat die with a diameter of 9 mm, a depth of 1.8 mm and a bevel of 5° was used (see Table 2). A geometric separation criterion was implemented to reproduce the material separation during the punching of the punch-sided sheet. This criterion has been shown to be suitable for ductile materials in [16] and has been described in detail in this study. On this basis, the minimum distance at which the punchsided material is separated was set to 0.1 mm. The meshing of the components required for the joining process was carried out with an element size of 0.1 mm, whereas the tools were meshed with a size of 0.5 mm. Since both joining partners undergo a large degree of deformation during the joining process, a time-interval-dependent mesh refinement was set for both sheets. A bilinear friction law was used to map the friction occurring between the contact pairs (see Fig. 5, right).
Fig. 5: Experimental data and implemented extrapolated flow curves for aluminium alloy EN AW-6014, T4 and rivet material 38B2, hardness H4 [17] (left) and used coefficients of friction [18] (right)
5 Design of Experiment (DoE)
Statistical design of experiments was used to efficiently design the sensitivity analyses. With the help of the Minitab statistics software, a central composite design (CCD) was developed for the investigation. The CCD links a two-dimensional factorial design with star points and as a minimum one-centre point [6]. The total number of experiments is determined by
𝑁 = 𝑘2 + 2𝑘 + 𝑛 (1)
In this formula, N corresponds to the number of experiments, k to the number of factors defined and n represents the number of replicates. In order to establish the experimental design, first a factorial experimental design is drawn up. This is extended by a centre point. With the help of the alpha value, which is calculated according to
𝛼 = (2𝑘)0,25 (2)
the distance of the star points from the centre is determined. Depending on the distance, the design is spherical, orthogonal,
rotatable or face-centred. The results of the investigation are evaluated by means of a response surface regression analysis. Correlation between independent and response variables can be determined by fitting them into the following second order polynomial equation:
Y represents the value of the target variable (response) and k stands for the total number of independent variables. Β determines the regression coefficient of the respective variable and ε stands for the stochastic deviation of the measured values [19]. A CCD with three factors is shown in Fig. 6.
Fig. 6: Central composite design of a three-factor experimental design [20]
5.1 Process parameters
SPR process can be influenced by various process parameters. These relate to the tools used, the process variables applied and the auxiliary joining elements. To characterise the different influencing variables, various die geometry parameters were selected and varied (see Table 2). In addition, the rivet length and the blank holder force were selected as influencing process parameters. In this analysis, the displacement of the rivet was adapted to the changed rivet length in each case, which is why the rivet head position is not considered a target value, as it remains constant.
Table 2: Variated process parameters
6 Results and Discussion
6.1 Validation of the simulation model
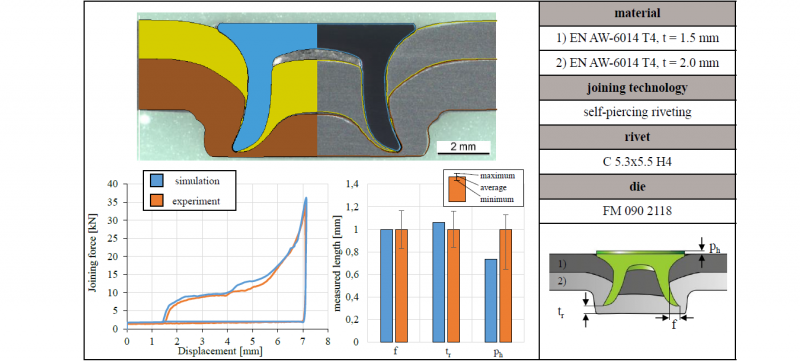
For statistical storage of the values, the sample number n = 5 was chosen. First, the simulation was validated using the geometric parameters determined by macrosections. Subsequently, the validation was extended by the comparison of the determined process curve from joining force and displacement (see Fig. 7)
Fig. 7: Validation of the simulation of the self-piercing riveting process of EN AW-6014 T4 (t = 1.5 mm) in EN AW-6014 T4 (t = 2 mm) using geometric characteristics and process curve
At the top of Fig. 7, an exemplary macrosection of the experiment compared with the simulation result is shown. The comparison shows that the quality-relevant characteristics rivet head position, interlock and minimum die-side material thickness are represented to a high degree. The feed-in behaviour of the aluminium into the die and around the rivet foot as well as the flow and rising behaviour of the punch-sided sheet into the rivet shank can be accurately reproduced. The comparison of the process curve shows a high degree of agreement according to the characteristic and the maximum force between simulation and experiment.
In summary, the simulation shows a satisfactory agreement in the quality-relevant characteristics and the process curve. The simulation is therefore to be considered valid and applied for further investigation.
6.2 Sensitivity analysis for process parameters
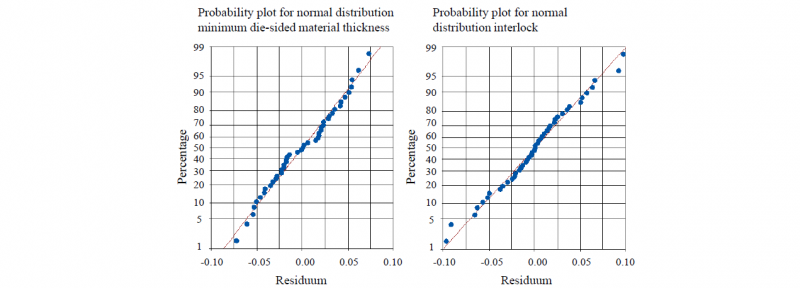
Using the Minitab software, it is possible to use analysis of variance to determine the influence of various factors on the joint formation. An alpha value of 0.05 is used in which the alpha value indicates the significance level. The normal distribution of the residuals shows no irregularities and thus confirms the plausibility of the investigation (see Fig. 8).
Fig. 8: Normal distribution of the residuals for minimum die-side material thickness (left) and interlock (right)
Fig. 9 shows the results of the sensitivity analysis for process parameters using a probability grid for the interlock and the minimum die-side material thickness. In relation to the interlock, there are three significant parameters. The rivet length has the greatest positive influence on the joint formation. On the other hand, the depth of the die has a negative influence. Additionally, the interlock is negatively influenced by changing the draft angle of the die. When analysing the probability grid in relation to the minimum die-side material thickness, it is noticeable that as well three individual parameters influence the remaining sheet thickness positively and negatively. Again, the rivet length as well as the die depth have a great influence. Considering the minimum die-side material thickness, the effects of these two factors are now reversed. The rivet length has the greatest negative influence and the die depth has the greatest positive influence on the minimum die-side material thickness. Again, the draft angle of the die has a negative influence on the minimum die-side material thickness as it influences the drawing of the sheet material into the die.
Fig. 9: Influencing process parameters on joining formation (left: effects on the interlock, right: effects on the minimum die-side material thickness)
A change in rivet length has the greatest influence on the interlock and the minimum die-side material thickness. By shortening the rivet, while maintaining the same conditions, the formation of the interlock is significantly reduced compared to the validation of the simulation model which is considered to be the initial reference configuration (see Fig. 10). Simultaneously, the minimum die-side material thickness is increased because less material is displaced by the rivet. Using a longer rivet increases the spreading of the rivet, which can be explained by the increased displaced die-sided material, which supports the expansion and thus the formation of the interlock. Furthermore, the penetration depth of the rivet into the die-side sheet (teff) increases by almost 20% due to the increase in rivet length.
Fig. 10: Influence of changing rivet length on joint formation while maintaining constant boundary conditions
With an increased rivet length and different die depths, the penetration depth of the rivet into the die-side joining part increases by using smaller die depths. Haque [4] also presented this correlation in his review. Similar to the investigations of Jäckel [11], the formation of the interlock decreases with increasing die depth due to a smaller expansion of the rivet. The reason for this relation can be found in the changed material flow of the die-sided material (see Fig. 11). Using a die with a small depth, the die-sided sheet reaches the bottom of the die early. Due to the limited space, the material can therefore only flow in direction of the die edge as the rivet feed increases. This supports the formation of the interlock. If a deeper die is used, the die-sided sheet will later strike the bottom of the die, allowing the material to flow further towards the bottom of the die as the inserted die provides a larger volume to accommodate the displaced material. The rivet can thus penetrate deeper into the die-sided sheet without being supported by the displaced material during expansion resulting in a smaller interlock.
Fig. 11: Changed material flow when using different die depths (left: Die diameter 9.5 mm, die depth 2.0 mm; right: Die diameter 9.5 mm, die depth 1.6 mm)
The consideration of the alternating effect of the interlock shows that many factors influence the formation of the influence positively and negatively. Of particular interest is the positive interaction between the die diameter and the rivet length. By using a smaller die diameter and a longer rivet, a greater interlock can be formed. The reason for this is the reduced volume of the die. This minimises the deformation of the sheets, allowing the rivet to penetrate further into the die-sided sheet, which leads to an enlarged interlock. This positive effect on the interlock ends, if the longer rivet is combined with a smaller diameter and a smaller die depth (see Fig. 12).
Fig. 12: Limiting the interlock increase by compressing the rivet (left: Die diameter 8.5 mm, die depth 2.0 mm; right: Die diameter 8.5 mm, die depth 1.6 mm)
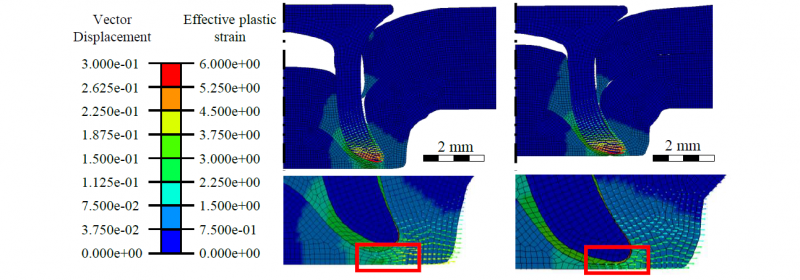
As the rivet penetrates and deforms the parts to be joined, the die volume, which is determined by the flatter and narrower die, is filled to the maximum. As the feed rate increases, the rivet is now compressed, which can be seen in the rising effective plastic strain rate of the rivet in Fig. 13. Contrary to the effects shown above, this reduces the penetration depth of the rivet into the dieside joining part. In addition, this leads to a smaller expansion of the rivet, resulting in a smaller interlock. The remaining thickness of the base remains unchanged at a low level. In addition, the use of a narrow deep die, as shown on the left of Fig. 12, can lead to a necking of the closing head. As a result, there is a risk of cracks due to excessive deformation of the die-sided joining part.
Fig. 13: Rising effective plastic strain as a result of the rivet compression (left: Die diameter 8.5 mm, die depth 2.0 mm; right: Die diameter 8.5 mm, die depth 1.6 mm)
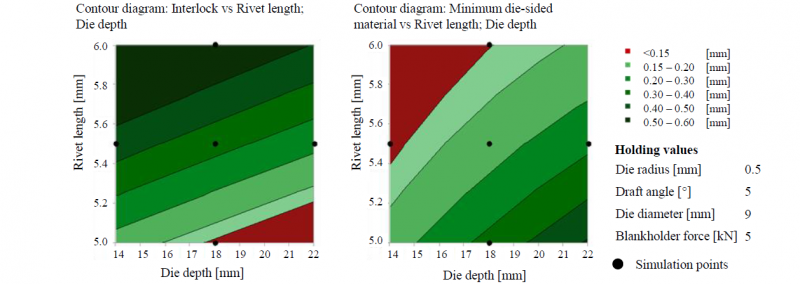
Additionally the negative effect on the formation of the interlock by the die depth is increased by enlarging the blank holder force. The increased blank holder force leads to a reduced deformation of the parts to be joined, which further increases the delayed rivet spreading. The minimum die-side material thickness is significantly influenced by the interaction of the die depth and the rivet length (Fig. 10). By reducing the die depth and increasing the rivet length at the same time, a smaller minimum die-side material thickness is formed. This correlation can be explained by the fact that the longer rivet has to travel a longer distance to achieve a constant rivet head position. If a die with a smaller depth is used as well, more material is displaced, resulting in a low minimum die-side material thickness.
In summary, the rivet length and the die depth have the greatest influence on the quality-relevant characteristics. It furthermore applies that positive effects on the remaining sheet thickness have a negative effect on the interlock and vice versa (see Fig. 14). The reduction of the die depth with a simultaneous increase of the rivet length leads to an increase of the interlock. However, this combination leads to a reduction in the minimum die-side material thickness. At the same time, it must be ensured that the rivet foot does not spread further than the diameter of the rivet head. Otherwise, the joint is considered to be unacceptable in this case. In addition, a small die depth in combination with a small die diameter and a long rivet should be avoided, as this can lead to a compression of the rivet resulting in a smaller interlock.
Fig. 14: Contour diagram of both interlock (left) and minimum die-side material thickness (right)
7 Conclusion
Using the study presented here, the influence of various process parameters on the formation of a SPR joint was analysed. For this purpose, a numerical axisymmetric 2D-model was established and validated. By using statistical design of experiments, the number of required simulations could be reduced while maintaining the same quality of results. The rivet length, the die depth and the die diameter have a particular influence on the joint formation. Especially the interaction between these individual factors must be taken into account. A particular interest is paid to the interaction between the increase of the interlock and the resulting minimum die-side material thickness. Also to be emphasised is the influence of the penetration depth of the rivet into the die-side material and the resulting enlargement of the interlock. This behaviour is reversed combining a long rivet and a flat, narrow die, as the rivet is compressed. In summary, the variation of process parameters leads to significant influences on the joint formation. This correlation shows the limits of currently rigid tool systems since they cannot react to changed boundary conditions. The results of the analysis form the basis for the development of and versatile joining systems, which can react to exactly these changes.
Acknowledgements
Funded by the Deutsche Forschungsgemeinschaft (DFG, German Research Foundation) – TRR 285 – Project-ID 418701707. The authors thank the German Research Foundation for their organisational and financial support.


![Table 1: Chemical composition and mechanical properties of EN AW 6014 [14] and semi-tubular rivet [15] used](docannexe/image/4277/img-3-small800.png)

