1 Introduction
Forging industries are currently facing big challenges as they have to deal with ageing production machines and at the same time they should respond to the stringent requirements from customers regarding the product quality and safety. Not to mention the high inspection costs. Thus some solutions have to be found to allow the instrumentation of forging machines in order to monitor important process parameters. Nowadays with the emergence of digital twin for manufacturing processes [1], the ways to monitor different parameters has been discussed. Concerning hot forged parts, [2] reviewed the measurement techniques to monitor the temperature and the dimensions of the part as well as the die wear. Moreover, especially regarding tooling failures and product damages, the use of acoustic emission is a solution proposed [3], and the position of acoustic emission sensor can be optimized to monitor hot forging [4]. If the focus is more set up on the machine, it has been shown that, with the help of a high speed camera, the impact speed of the ram can be determined on forging hammer [5] or on counter-blow hammer [6]. The same measurement principle can also be applied with stereovision system [7]. And pushing this method further, the kinetic energy can be deduced from the impact ram speed measured. Besides, stereovision systems allow to perform 3D tracking point and therefore the deformation of some press elements can be measured during forging operations. This was done on a mechanical press [8] and on a screw press [9]. Measuring the force developed by the machine during a forging process can also be a way to monitor the press performances and a good indicator of tools failures. That’s what was highlighted by [10] and [11] who used bold piezo-sensor embedded at different location on tools. On a mechanical press, a predictive monitoring and diagnosis system is developed to control a cold extrusion process. For that, the press is instrumented with piezoelectric transducer measuring forces at different locations and accelerometers measuring spatial accelerations of shaft, torsional vibrations, and twisting motion. These signals are used to detect deviations of the process from its optimal flow [12]. Mechanical and hydraulic presses are machines that are easier to monitor thanks to embedded sensors in comparison to energy piloted machines, likes screw presses or forging hammers, for which conditions are more severe particularly due to their dynamic behavior. Besides, no comparison of signals coming from different types of sensors were found in order to give guidelines to achieve the most reliable and accurate forging machine instrumentation, depending on its environment (industry or laboratory) and purposes. However, depending on the type of sensor used and on its location, information recorded can be very different and this has to be taken into account if a process has to be precisely monitored.
That is why, in this paper, a study on the response of different types of displacement and force sensors is realized for the case of copper forging on a screw press. The different technologies used are presented, results obtained are compared and discussed. Methods to deduce ram speed from displacement sensors thanks to a Kalman filter are also proposed. Finally, a critical analysis on the sensor types allows to propose some optimal ways to use sensors in order to monitor a forging process on an energy piloted machine, whether it is in industry or in laboratory conditions.
2 Forging process and monitoring sensors
This study is conducted on the Vulcain Platform in Metz in France, on the direct drive screw press Lasco SPR 400, belonging to the category of energy piloted machine. This means that all experiments are in dynamic conditions and not in static conditions. Thus, this requires the use of sensors adapted to dynamic conditions. The aim of this study is to be able to accurately record the ram displacement, the ram speed as well as the force applied by the ram on the work piece. But this study does not pretend to be exhaustive, other types of sensors could have been used even in dynamic conditions.
With energy piloted machines, two different types of blow can be distinguished: soft blow or inelastic collision where the energy developed by the machine is significantly dissipated into the plastic deformation of a billet, and hard blow or elastic collision, where the energy developed by the machine is significantly dissipated in elastic deformation of the machine frame.
In this study, in order to observe soft blows, upsetting of a copper cylinder was performed whereas hard blows were obtained thanks to bare strike performed without any billet under the tools. Experimental conditions are summarized in the Table 1.
Table 1. Experimental conditions for soft and hard blows
|
Soft blow Cu upsetting test |
Hard blow Bare strike (without billet) |
||
|
Diameter |
50 mm |
||
|
Height |
30 mm |
||
|
Temperature |
19 °C |
||
|
Energy (%) |
25 % |
Energy (%) |
28 % |
|
Energy (kJ) |
7.25 kJ |
Energy (kJ) |
8.12 kJ |
|
Ram Speed |
340 mm/s |
Ram Speed |
360 mm/s |
2.1 Displacement sensors
To record the ram displacement, the sensors used were the following: a high speed camera, a magnetic incremental encoder, 3 laser sensors, and an accelerometer. The high speed camera is set up at one meter away from the press and focuses on target points glued on the tool, the magnetic incremental encoder is integrated to the press, the laser sensors and the accelerometers are set up on the tools.
2.1.1 High speed camera
Nowadays high speed cameras are able to film a scene with very high resolution (ranging from about 60 ×10 pixels to 2000 ×2000 pixels) at very high frequency of acquisition (ranging from 24 pictures/s to 650 000 pictures/s), and with enough internal memory to record all data. Even though, it should be recall that it is not possible to register a film with the highest frequency of acquisition at the highest resolution. There is a relation between the choice of the resolution and the frequency of acquisition: the more the frequency of acquisition chosen is high, the lower the resolution will be, and inversely. In order to measure the displacement of the ram of a forging machine during a blow, the most important criterion to set up is the frequency of acquisition, as it has to be high enough in relation to the maximum speed of the ram. For energy piloted forging machine, the ram speed can range from 0.5 m/s to 9 m/s.
In our case, the screw press under study has a maximum ram speed of 0.7 m/s, and a high speed camera Photron Fastcam SA3 with a maximal acquisition frequency of 120 000 pictures/s was chosen. The camera is placed facing the press, with a lighting projector allowing continuous lightning of dies, equipped with sights, to follow their displacement during strikes. The images recorded are then calibrated: the relationship between one-pixel size and a distance in mm is defined. Counting the number of pixel between two sights, the distance can be deduced.
2.1.2 Magnetic incremental encoder
Magnetic measuring systems operate in a way that the sensor moves without contact over a magnetic tape located on an upright of the machine. The magnetization is carried out with defined pole pitches. By scanning of the magnetic poles an analog signal is generated, which is converted into digital square wave signals processed by electronics. The sensor detects the pitch of the strip and converts the information into a high-resolution path. Thus, it allows recording the ram position in comparison with the bottom dead point of the system, for each increment. Magnetic sensors present the advantages of being insensitive to dirt, oils and moisture and relatively stable at shock and vibration. They can also work under temperatures ranging from 0°C to 60°C, and record displacement with a maximum speed of 20 m/s.
Such a magnetic measuring system (MW991424 from IPF Electronic) is integrated on our screw press, with the magnetic tape located on one upright of the press. This magnetic encoder can record ram speed up to 5 m/s with a resolution of 10 μm.
2.1.3 Laser sensors
Laser spots are projected on a surface and the reflected light falls incident onto the receiving element of the sensors, at a certain angle depending on the distance. From the position of the light spot on the receiver element and the distance from the sender to the receiver element, the distance to the measurement object is calculated in the sensor. Laser sensors have a measuring range from 2 to 750 mm, a measuring rate up to 50 kHz, and a resolution up to 0.03 μm. However, it is not possible to measure with the laser at the highest measuring range with the highest measuring rate and at the highest resolution. There is a relation between the choice of the measuring range, rate and resolution: the more the measuring range is high, the lower the resolution and the measuring rate will be, and inversely.
In this study, three laser sensors were placed around the lower die and the laser spots are projected on the surface of the upper die. The laser sensors used are micro-epsilon ILD1401-200 with measuring range up to 200 mm, a measuring rate of 1 kHz and a resolution of 40 μm. The upper range limit of 200 mm of the sensor limit the measurable stroke height of the forming process, but in our case this limit is high enough as the maximal upsetting course of our screw press is of about 150 mm at a maximal speed of 0.7 m/s.
2.1.4 Accelerometers
The accelerometer is constituted of MEMS variable capacitance sensing elements on each axis, which consists of a very small inertial mass and a flexure element cantilever positioned between two plates. As the mass deflects under acceleration, the capacitance between these plates changes. The accelerometer’s internal signal conditioner provides then an analog output signal proportional to the applied acceleration. This output signal is scaled as a voltage which is proportional to the applied acceleration. The accelerometer can work under temperature ranging from -55°C to 125°C with a frequency response of 2 kHz.
On the screw press under study, two triaxial capacitive accelerometers (Kistler 8396A050) are set up on the upper and lower die respectively to measure acceleration in three mutually perpendicular axes. These accelerometers have an acceleration range of +/- 50g, a resonant frequency of 6.5 kHz.
2.2 Deducing ram speed from displacements
The ram speed can be calculated trough the derivation of the ram displacement. Another method to deduce ram speed, is to use a Kalman filter on the signal registered by accelerometer. As accelerometers are sensors measuring the acceleration of an object in motion, mathematically, it is possible to determine the position of this object by integrating the signal twice and knowing the initial position and speed of the object. Unfortunately, the estimation error of the initial conditions, the error of the measured acceleration and the noise of the signal make this approach inaccurate due to integration bias [13]. However, if the accelerometer is coupled with a displacement measurement (even a low quality one), it becomes possible to estimate the displacement and the speed of the object with a good accuracy thanks to a Kalman Filter [14] – [16]. Applying this method using the Kalman filter is new in the forging domain, indeed, in the literature, the application of this method was only found for aeronautic studies.
So here, the Kalman filter was used, first to filter the displacement obtained from the laser sensors, but principally to estimate the ram speed. The problem can be written in discrete form with the following matrices [17]:
and zm, 𝛾m the position and acceleration measured, 𝑧,𝑧̇ the position and speed estimated, 𝑇a the measured interval, and 𝐰k, ηd the covariance matrix. More detail of the algorithm used to estimate the displacement and the speed thanks to the Kalman filter can be found in [17].
2.3 Force sensors
Regarding force sensors, piezoelectric transducers are often used to record force under dynamic conditions. But here another sensor technology was chosen, using contact extensometer also suitable for accurate dynamic force measurements, in our frequency range.
For the force sensor integrated to the press, the exerted force is measured and recorded by strain gauges, located on the cross-head of the press. A solid connection is formed between the strain transducer and the cross head of the press with 4 screws. Mechanical loading causes a change in length of the cross head which is then transferred to the strain transducer. The change in length changes the electrical resistance of the installed strain gauge proportional to the strain. This is converted into output signal by the integrated DC amplifier. Here the extensometer is an HBM SLB-700A/06VA1 with a voltage output of 0 to 10V, a measuring range up to 500 μm/m and an operating temperature ranging from -20°C to 60°C.
The same sensor technology is used for an external force sensor integrated to the tools and located under the lower die. Thus, at this location the force sensor is closer to the location of the strike. Here the extensometer was made by Doerler, it has a voltage output of 0 to 10V, a gauge resistance of 350 Ω and can measure up to 6300 kN. The sensor has a stiffness of 1.1010N/m which is higher than the press one (approximately 3.109 N/m) and therefore should not impact the forging process.
To complete this experimental set up, the force was also deduced from the deformation of a calibrated copper cylinder. In the literature, the copper upsetting method is used to determine the energy of forging equipment [18], [19], [6] knowing the rheology of the material. Here the same method is applied and pushed forward to determine the forging strength. Copper is used as it is a material with a low strain rate sensitivity [20] and the cylinders are designed to limit thermal heating in order to limit the influence of the temperature on the flow stress. Then, if the strain is considered to be uniform during the compression of a cylindrical billet, the expression of the forging strength can be determined by an integration of the equation of equilibrium and the slab method. If the friction between the die and the billet is expressed according to the Coulomb’s rule, the expression of the forging strength can be reduced to [21], [22]:
Where 𝐷𝑖 and ℎ𝑖 are the diameter and height of the billet, 𝜎𝑖 it flow stress, and 𝜇 the coefficient of friction. The flow stress of the material can be expressed by the Hansel-Spittel law with {𝐴,m1,m2,m3,m4} the material dependent parameters:
Where the strain can be defined by:
And the strain rate is estimated thanks to the Euler method (if the sampling time 𝑇𝑎 is low enough)
If the barrel effect is neglected, the diameter of the specimen can be expressed as a function of the height thanks to the volume conservation principle.
Thus, by measuring the copper specimen height during the deformation, it is possible to estimate the forging strength. The parameters of the Hansel-Spittel law used for the 99.7% pure copper are resumed in Table 2.
Table 2. Parameters of the Hansel-Spittel laws for 99.7%Cu
|
𝐴 |
411.19 MPa |
|
𝑚1 |
-0.00121 |
|
𝑚2 |
0.21554 |
|
𝑚3 |
0.01472 |
|
𝑚4 |
-0.00935 |
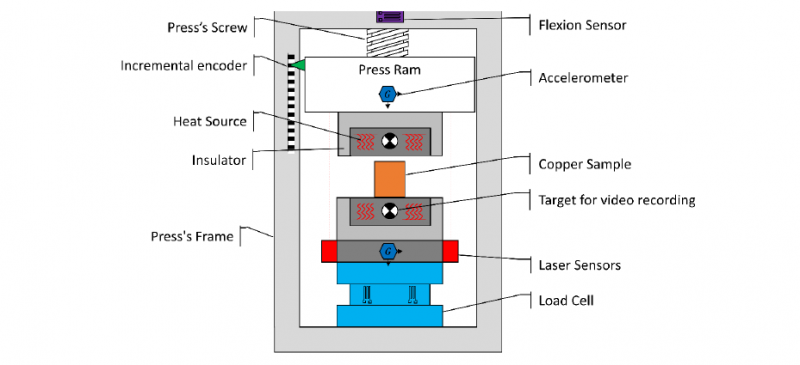
The location of all the different sensors used is summarized in Figure. 1.
Figure. 1. Schematic of the location of the different sensors
3 Results
3.1 Displacements
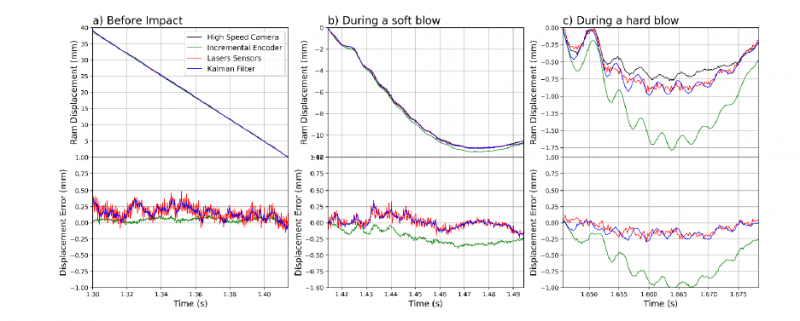
Displacements signals coming from the different sensors are compared in Figure 2. The signal coming from the high speed camera is taken as a reference, as it is the only sensor with an absolute referential, independent from the press. First of all, displacements signals are compared before the impact and it appears clearly that all signals are overlapped. So, during the acceleration phase of the ram, all sensors give the same information, meaning that the high speed camera was correctly calibrated.
Differences between signals are appearing during the blow. During a soft blow on a copper cylinder, it is noticeable that the displacement signal of the incremental encoder is slightly higher than the displacement recorded by the other sensors. A maximal deviation of 0.25 mm is observed compared to the displacement measured by the high speed camera. The maximal deviations are observed for the hard blow: all signals are varying due to the vibration of the press, but the displacement recorded by the camera, the laser sensors and the Kalman filter are quite close. The displacement recorded by the incremental encoder is strongly different than the other signals. A maximal deviation of 1 mm is observed between the displacement signal of the encoder compared to the camera. This is a non-negligible difference.
Figure 2. Comparison of displacement signals from the different sensors
3.2 Ram speed
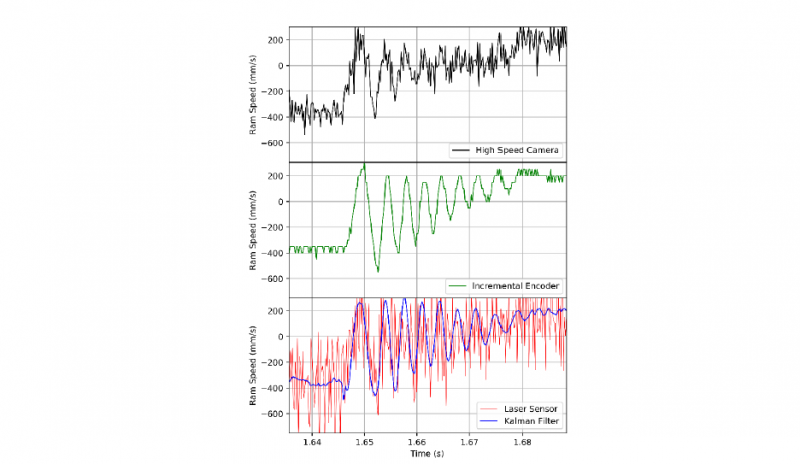
Then, the ram speeds are plotted separately Figure 3. in order to distinguish clearly the form of each signal. The ram speed deduced from the high speed camera and the incremental encoder have similar tendency, with some noise, but the increment encoder shows largest amplitude of speed variation. Concerning the laser sensors, the ram speed obtained from the displacement is a seriously noised signal. Thus the Kalman filter was used resulting in a much cleaner signal.
Figure 3. Comparison of ram speed signals
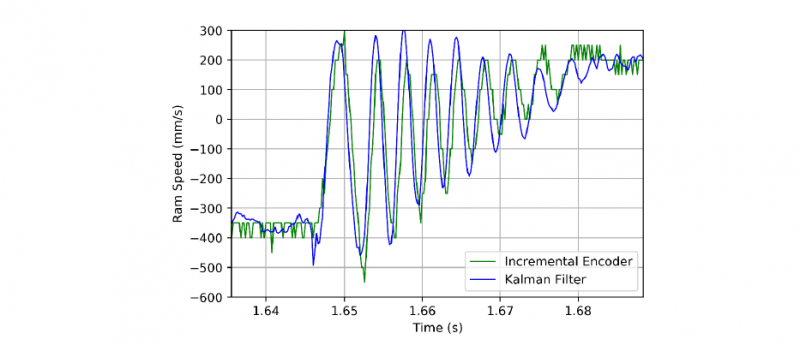
Comparing the ram speed of the encoder and the one from the Kalman filter on Figure 4., it appears that the two signals are quite close, with speed variation of the same amplitude.
Figure 4. Comparison of ram speed from the incremental encoder and the Kalman filter
3.3 Forces
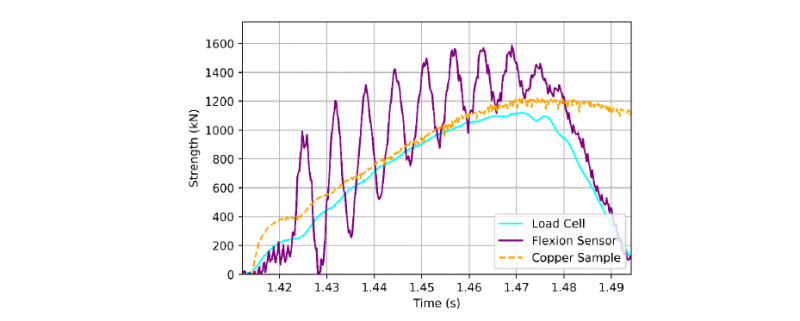
Forces recorded by the different sensors during the blow on a copper cylinder are plotted Figure 5. The signal of the flexion sensor integrated to the press, shows some high forces variation during the blow, while signals from the load cell integrated to the lower tools is smoother. The signal deduced from the deformation of the copper sample with a known rheology appears to be quite close to the force recorded by the load cell, except at the very beginning of the blow and at the end, where the force deduced from the deformation of the copper is not decreasing like the force from the load cell does. But this is quite normal, as the force deduced from the copper material law is not taking into account the springback effect.
Figure 5. Comparison of strength recorded by different force sensors during upsetting tests on a copper cylinder
4 Discussion
Some disparities in signals recorded by the different sensors were highlighted, but they can be explained by the technology used. Indeed, each type of sensor has its advantages and drawbacks.
4.1 Displacements
To measure the displacement of the ram, the high speed camera presents the advantage of being an external reference, as the camera is not fixed to the forging machine. Thus displacements measured by the camera are in an absolute referential. But it also has for consequences that the camera is difficult to set up, and that the system is not automatable. Moreover, the acquisition time is limited by the memory capacity of the camera and the data treatment time is quite long. Besides, results coming from a high speed camera may have some errors due to limited minimal resolution of +/- one pixel, a wrong calibrating between pixels and mm, or some parallaxes. Even though it should be noted that some strategies have been developed to get subpixel accuracy in image recognition tasks [23]. So the solution of using a high speed camera to measure ram displacement is a good option in the framework of a laboratory, in order to have information redundancy or with the purpose to accurately define a mechanical model. This system can also be used in the industry but for exceptional occasions, and not under normal conditions of production.
The incremental encoder is embedded into the press, making it permanently available and automatable to record ram displacement, but in counterpart it also takes into account the vibration of the press frame. For inelastic impact, the accuracy of the incremental encoder is quite acceptable compared to the other methods used. Indeed, in that case, vibratory phenomena are not activated and the low forging force involved induced a low frame elongation, resulting in a negligible measurement bias. However, during the hard blow, the displacement measured by the incremental encoder shows a difference of 1 mm compared to the other signals, and this can be attributed to the press frame elongation during the blow. Thus, the incremental encoder constitutes an embedded solution, suitable for laboratory as well as industries, that can automatically provide ram displacement but may requires a filter to suppress parasitic vibrations of press frame.
Laser sensors are located on the dies, thus having a machine referential, but they are not parasitized by press vibrations. For room temperature forging processes, they are quite convenient because they can be placed directly on the forging die. However, in hot forging conditions, they have to be placed behind an insulating barrier to prevent them from thermal damage and avoid them to be disturbed by the die yield. Anyway, some errors can occur with laser sensors, if the laser beam is not perpendicular to the measured surface. Laser sensors may show some limits in dynamic as they often have lower acquisition frequencies and lower resolution than in static. This can be seen on the hard blow experimental results, where laser sensors have a low bias compared to the camera, but they are not able to measure the dynamic behavior of the press. More importantly, lasers are very sensitive to dirt and the signal can be disturbed if an object is crossing the laser beam (oxide, flame, oil, etc…). That is why several laser sensors are used simultaneously: indeed, if one laser signal is disturbed, the others still can provide the information. Another solution could be to place the laser sensors a bit more far away from the stroke location, but then it loose its interest, and lasers will remain more sensitive than an incremental encoder. So for all these reasons, laser sensors are not really adapted to forging industries in production conditions but may be more suitable for laboratory purposes.
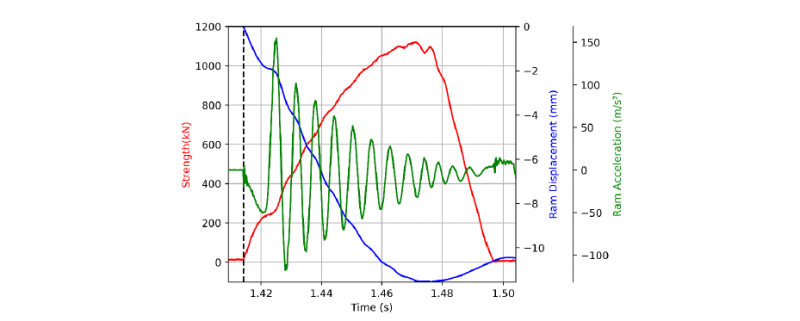
Figure 6. Synchronized acquisition of the ram displacement measured by the incremental encoder, the ram acceleration measured by the accelerometer and the strength from the load cell
Finally, accelerometer cannot directly measure the displacement of the ram since double numerical integration of the acceleration signal is highly sensitive to noise and calibration errors. However, the use of accelerometer in addition to a displacement measurement can be useful to identify the instant of contact between the upper die and the billet (Figure 6). This is really useful, especially for successive strokes, as it allows to know for each strike, the initial height of the billet. Moreover, a displacement and an accelerometer signal can be combine through the use of a Kalman filter to increase the accuracy of the displacement, particularly for dynamic. But the use of accelerometer can also present some limitations: errors can be made if the axis of the accelerometer is not aligned with the axis of the stroke, and piezoelectric accelerometers cannot measure constant acceleration and therefore cannot be used for inelastic solicitation. Thus, accelerometers can be used both in laboratory and industry environments, but they may be not sufficient alone to monitor a process and the sensor technology has to be carefully chosen to correspond to the scientific goal to achieve.
4.2 Ram speed
The ram speed is determined by deriving the displacement recorded by the high speed camera, the incremental encoder, and the laser sensors. The ram speed obtained from the high speed camera is moderately noisy, whereas the speed deduced from the incremental encoder is cleaner. Deriving the displacements measured by the lasers give an extremely noisy signal, impossible to analyze. And integrating the acceleration measured by the accelerometer, generates integration bias and requires to precisely know the initial speed. Thus, a new method is applied, combining both laser and accelerometers signals through a Kalman filter. It results in a clean ram speed signal, close to the ones deriving from the camera and the incremental encoder, but with even less noise. This method using the Kalman filter provide reliable results for two reasons: first the displacement signal from the lasers is filtered and the dynamic is added thanks to the accelerometer, and the integration bias on the accelerometer signal is reduced thanks to the addition of the lasers displacement signal.
4.3 Forces
The flexion sensor embedded in the press crosshead can be automated but is parasitized by the press frame vibrations, whereas it is not the case for the load cell embedded in the lower die as it is closer to the stroke location. In counterpart, the sensor in the lower die has to be deformable to measure a deformation by extensometer, thus it added a compliance to the entire system, and a source of energy dissipation. Besides, the thermal behavior of the process has to be under control, as the sensor do not resist to high temperatures.
Additionally, the force of the process was deduced from the copper deformation. Of course this method can only be applied in specific conditions: the adiabatic heating has to be mastered, the friction conditions should be known, the rheological law of the material has to be correctly identified and the displacement measurement has to be accurate. But this method is really interesting as it allows to know the force without any additional load sensors. This can be useful to perform measurements on industrial forging machines; on which it is not possible to embed any sensors.
Other sources of error that concern all types of sensor is regarding the acquisition channel: calibrating errors or lack of signals synchronization can occur.
5 Conclusions
In this paper, different types of sensors are used to measure displacement and force in the case of a copper cylinder upsetting with a screw press. The technology of each sensor is detailed and their advantages and drawbacks are discussed. A new application of the Kalman filter was also developed to deduce ram speed from both ram displacement and acceleration.
To measure ram displacement, laser sensors set up on the tools seemed to be a good option for laboratory purposes as the signal is really close to the high speed camera one, taken as a reference, for soft blows as well as for hard blows. In this study, laser sensors showed some limitation to measure the dynamic behavior of the forging process but this issue may be overcome by choosing laser sensors designed for dynamic purpose. But laser sensors alone are not sufficient to deduce ram speed: an accelerometer has to be added and a Kalman filter should be applied on both displacement and acceleration signals. Accelerometers also allow to precisely determine the impact point which is valuable for successive blows. For the industry, a good alternative to measure ram displacement is provided by incremental encoder embedded in the forging machine: results are reliable and can be filtered to suppress press vibrations if needed. Concerning the forging force, load cells with extensometer are providing satisfying results when the sensor is embedded close to the location of the strike. In the case where a load cell could only be embedded in the press frame, data should be filtered to suppress parasitic vibrations. And if a machine cannot be instrumented in force, it has been shown that deducing the force from the deformation of a billet with a known rheological behavior is providing relative good predictions until reaching the maximal force.
Acknowledgements
The authors would like to thank M. Jean Francois Mull and M. Alexandre Fendler for their help on the project. The authors would also like to thank ISEETECH for the provision of the Vulcain 4.0 platform dedicated to forging tests.


