1 Introduction
Today, the use of rapid prototyping techniques is growing, due to the interest to manufacture new products and to receive feedback in the shortest possible time, as well as to increase economic productivity in low-volume production; all these aspects can hardly be obtained by conventional processes. With regard to the sheet forming processes, the class of the incremental forming processes is one of the most interesting. They can be carried out replacing presses and dedicated tool systems by simple and low-cost tools; moreover, they promise more flexibility, lower production cost and lead time, in addition to an improved material formability compared to the conventional sheet forming processes. On the other hand, they show high processing time and critical issues lied to surface and geometrical quality [1]. Incremental forming is currently used for the manufacture of components in metal and more; in fact, in the last decade, the incremental sheet forming has been not only considered for the production of prototypes and functional metal components in automotive and aeronautics, but has been extended to shape different thermoplastic polymer sheets [2-3]. The process provides for the imposition of localized deformations to a peripherally clamped sheet by using a simple shaped tool, typically with hemispherical head, that describes a path controlled through a CNC machine [4-5]; in doing so, the shape of the final product is achieved.
The investigation of the tool/sheet contact conditions, in order to evaluate the influence of this aspect on the goodness of an incremental sheet process, represents an interesting topic when forming metals [6]; even more so, for those materials which show poor tribological properties. For example, consider Titanium and its alloys [7-9]: this materials family presents some intriguing properties but, at the same time, shows difficulties to be processed due to its high and unstable friction coefficient, severe adhesive wear, susceptibility to fretting wear, scuffing and a strong tendency to seize [10]. Concerning the incremental forming of grade 1 Titanium thin sheets, Formisano et al. [11] studied the influence on the surface quality and the formability of untreated and thermally oxidized sheets by varying the tool/sheet contact conditions, highlighting the workability limits of this material and a viable solution for improving the aspects under examination.
The observations on the tribological behavior of Titanium and its alloys are also true for Niobium (Nb), so as reported in [12]. Conversely, this ductile transition metal shows very attractive properties, like high melting point, quite low density, good ductility, high corrosion resistance and superconductivity at very low temperature [13-15]; this last peculiarity makes pure Nb suitable for the manufacture of superconducting radiofrequency cavities for particle accelerators [16-19], obtained by deep drawing of sheets, then electron beam welded and machined [20]. The above justifies the recent increasing research interest in the understanding of Nb properties and the deformation mechanisms [21-24]. Moreover, other studies investigated the surface damages of Nb sheets during forming processes, like grinding marks, inclusions, galling phenomenon, orange peeling, tearing, scratches and wrinkling [25,26]. Precisely in order to better understand the friction behavior of Nb sheets during forming processes, the authors presented the results of an experimental campaign based on wear tests, carried out under different loads and in both dry and lubricated conditions [27]. These two different conditions are hereinafter referred to as “dry” and “lubricated”. More specifically, the wear tests were carried out at room temperature by using a pin-on-disk apparatus (Ducom TR20-LE) and following the ASTM G99-17 standard; the Nb specimens were tested with pins of stainless steel. The roughness of the tested specimens was measured by a confocal microscope, also used for observations of the worn surfaces; furthermore, the investigation provided for SEM observations and EDX analyses. The main conclusions were that a severe adhesive wear interferes within the tests in dry conditions and translates into very high friction coefficient values, dramatically reduced by using the lubricant; in this last condition, the abrasion is predominant, rather than adhesion.
In light of the above, we can say that the incremental sheet forming process can be normally used for the manufacturing of low volume batch parts with complicated geometries and this fits well with several products made of Nb; at the same time, it is fundamental to deepen the knowledge related to tribological aspects interesting the tool/sheet contact. As a consequence, this work dealed with the investigation of the incremental forming of thin sheets of pure Nb, in dry and lubricated conditions; the aim was the analysis of the forming forces and of the roughness of the worked surfaces. To this end, square pyramid frusta with fixed wall angle were manufactured by the simplest variant of the process, named single-point incremental forming (SPIF), that provides the adoption of a single simple shaped forming tool and the absence of dies, and the results from an experimental campaign on unlubricated and lubricated sheets were compared.
2 Experimental phase
The material investigated in this work was pure Nb, in the form of rolled sheets, 0.5 mm in thickness; its chemical composition is reported in [28]. In the following of this section, the SPIF process and the features investigated during its carrying out and on the components incrementally formed are presented.
2.1 SPIF process
Fig. 1 shows the equipment for the SPIF process employed in this work, whereas Fig. 2 reports a CAD model of the forming tool and of the components made by SPIF. In detail, simple shaped components were manufactured in order to evaluate the forming forces and to investigate the quality of the worked surfaces. Squares of sheets were constrained along their periphery by a clamping frame, having a forming area of 100 × 100 mm2. The SPIF process was carried out at room temperature, using a hemispherical tipped forming tool (see Fig. 2a), made of stainless steel and 10 mm in diameter (D); it was mounted on the mandrel of a CNC machine, in the specific a C.B. Ferrari high speed four-axis vertical machining center.
Square pyramid frusta (see Fig. 2b) with major side L=70 mm and fixed slope angle (α=60°) were manufactured by setting a feed rate of the tool, which described a helical path in a clockwise direction around the z-axis (following the right-hand rule, see the arrowed line in figure), equal to 3000 mm/min; the step between two consecutive spires of the path was set equal to 0.5 mm, in order to reach a designed height h=39 mm. This shape typology allows a simple interpretation of the forming forces and an easy measurement of the surface roughness, the two features investigated in this work.
In order to assess the influence of the tool/sheet contact conditions, the SPIF process was carried out in dry and lubricated conditions, in line with the preliminary pin-on-disk tests described in the Introduction section [27]; in particular, a thin layer of Reactolab industrial grease, applied with a brush on the sheet surface in contact with the forming tool, was used as lubricant.
2.2 Features investigated
The measurement of the vertical (FZ) and one only horizontal (FY) component of the forming forces was made by means of a three-axis Kistler 9257A piezoelectric transducer, mounted at the bottom of the clamping frame; it was accompanied by a NI 9239 input module and the VBA 1.0 B software. The data were acquired at 2000 Hz and, then, filtered.
The forming forces were analyzed during the steady-state condition of the process (i.e. after the trend of the forces becomes almost constant) and the values measured in the central area of two contiguous walls of the frusta (see the zones delimited by the dashed lines in Fig. 2b) were compared. In particular, the vertical force of one only wall is suffice to describe this feature, while the horizontal components on two contiguous walls must be considered, due to the fact that one component (FY,fr) furnishes information lied to the tool/sheet friction [11] and the other one (FY,th) to the thrust on the pyramid walls [29]. All these aspects are shown in Fig. 2b.
The evaluation of the surface quality involves high-magnification visual inspections and the measurement of different roughness parameters along the cross-section of the worked surfaces; in particular, the mean roughness (Ra) and the root mean square roughness (Rq) were measured by means of a Mitutoyo Surftest SJ-301 tester, adopting differential inductance and Gaussian filters as the detecting method and selecting the cut-off in agreement with ISO 4288-1996 standards. At least five measurements were recorded for each case.
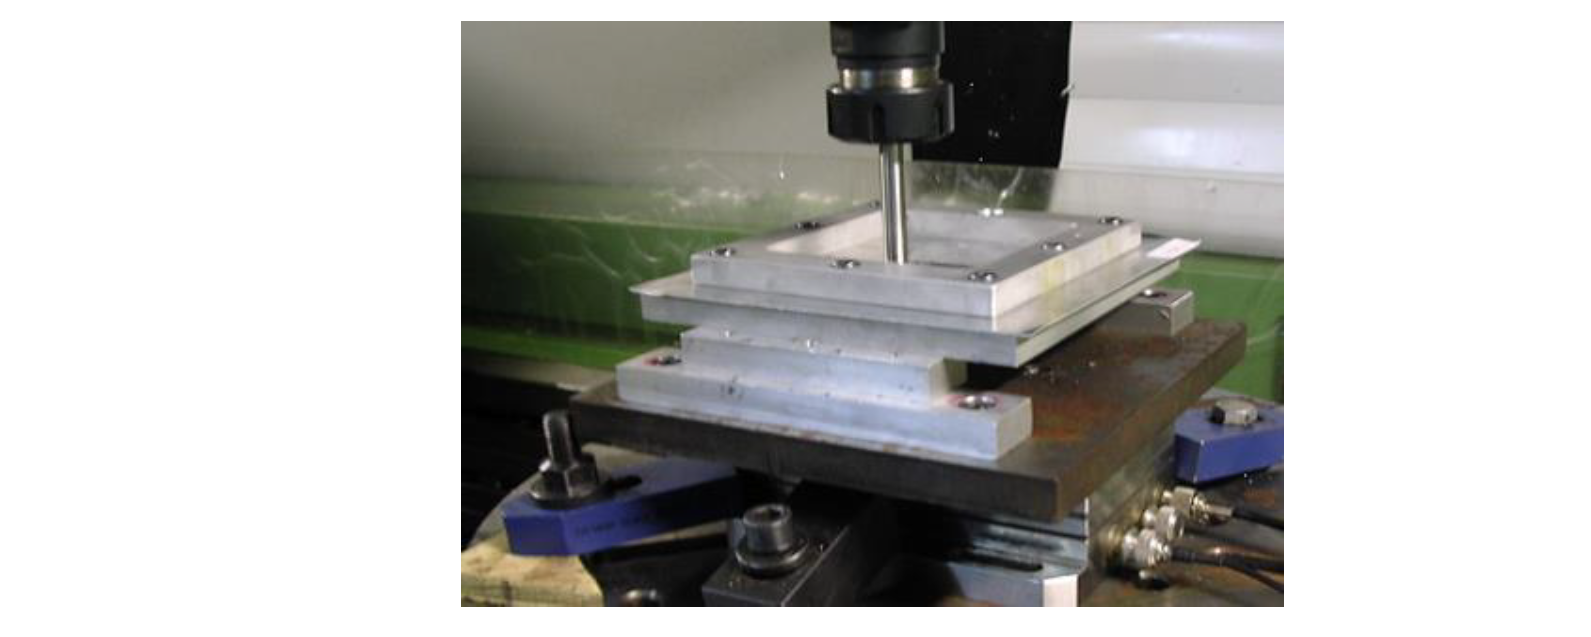
Fig. 1. Equipment employed for the carrying out of the SPIF process.
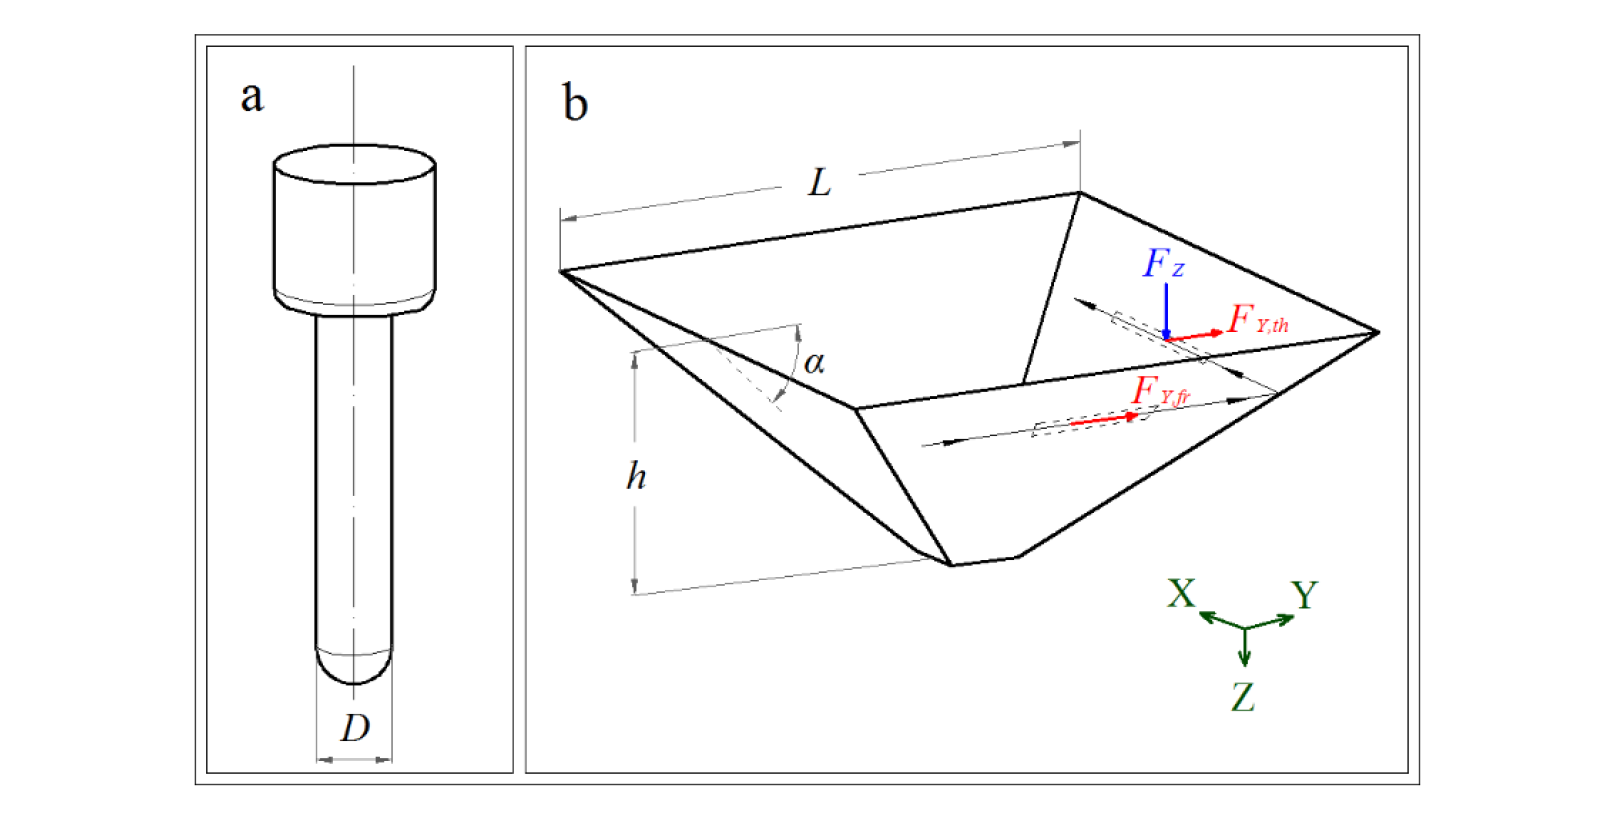
Fig. 2. CAD model of (a) the forming tool and (b) the fixed slope angle square frusta obtained by SPIF process, with details of the geometrical features and of the forming forces.
3 Results and Discussion
The tests carried out without lubrication record the occurring of failures, so as shown in Fig. 3, differently from the ones on lubricated sheets; while not carrying out formability tests, we can affirm that the tribological aspects condition the formability limits of Nb sheets and suggest further investigation related to this topic. The occurrence of cracks is also evident by observing the trends of the forming forces reported in Fig. 4. In fact, you can note that for both cases the steady-state condition is reached after about 150 s, but the premature stop of the process was necessary for the test in dry conditions, at a time just as the crack affected the surface of the component (about 450 s, Fig. 4a, corresponding to a height of about 16 mm).
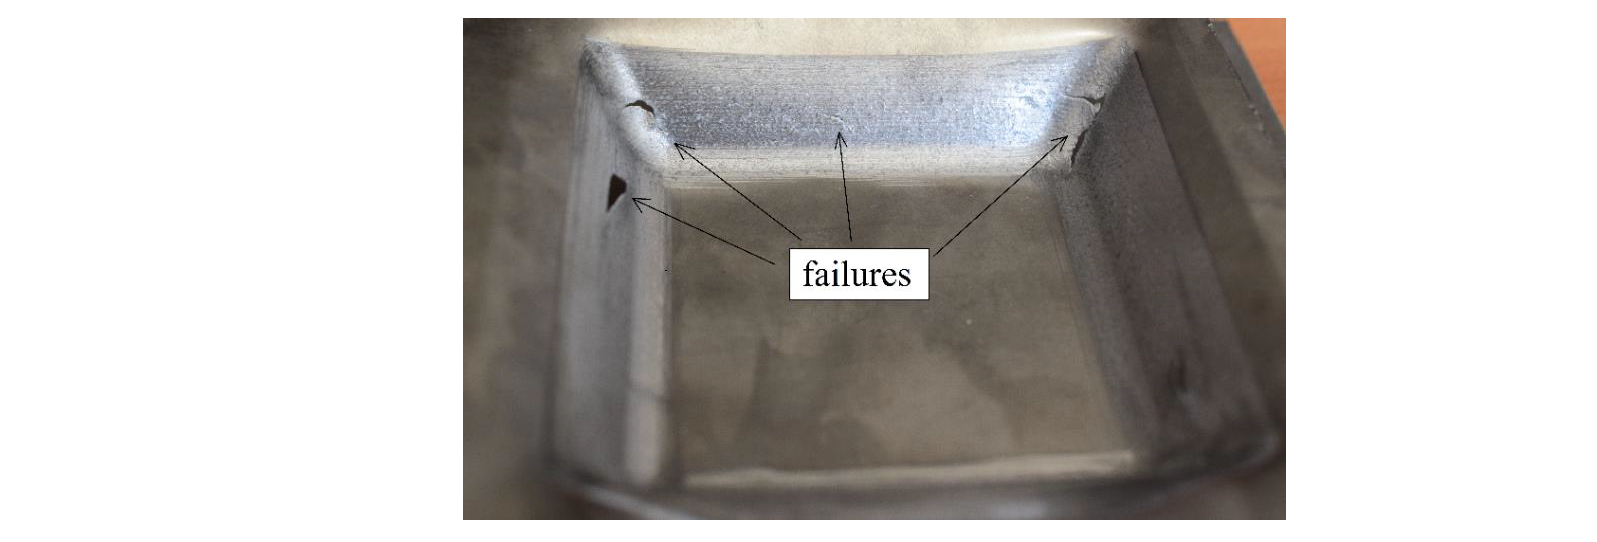
Fig. 3. Failures interesting a square pyramid frustum from a dry sheet.


Fig. 4. Trend of the components of the forming force for (a) dry and (b) lubricated conditions.
In order to draw conclusions on the forces in the central area of the frusta wall during the steady-state, consider Fig. 5, which reports the trend of the force components after the same toolpath progress. You can note that the forces lied to the trust on the sheet, that is FZ and FY,th, are similar for dry and lubricated conditions. These components depend on the mechanical behavior of the forming tool and the sheet; under the assumption of rigid behavior of the tool, we can affirm that these two components depend on the thickness and the mechanical properties of the sheet and, consequently, they are not influenced by the tool/sheet contact conditions. On the contrary, the component lied to the tool/sheet contact condition, i.e. FY,fr, results higher and more irregular for the dry sheet. This confirms the considerations on the variation of the friction coefficient from the results obtained in [27].


Fig. 5. Steady-state condition of the components of the forming force: (a) FZ; (b) FY.
Concerning the surface roughness, the histogram in Fig. 6 reports the values of Ra and Rq from the components obtained under dry and lubricated conditions (the error bars represent the corresponding standard deviations). The figure clearly highlights an improvement of the surface quality for the lubricated components, for which the roughness values result decreased to less than half.
The dry sheets show galling; this phenomenon is a type of adhesive wear and it is caused by macroscopic transfer of material between metal surfaces during relative sliding motion. It generates scratches on the worked surfaces, so as observable in Fig. 7a; this also reflects on the higher irregularity of FY,fr, so as Fig. 5b highlights. These scratches not only worsen the surface quality, that for components in Nb like them presented in the Introduction section is a fundamental aspect, but can represent onset of failure; this is a heavy risk, especially for thin sheets like the ones used in this study, since it can reduce the formability limits of the sheets. On the contrary, the presence of grease reduces the friction, and the galling is very limited; in this respect, Fig. 7b highlights that the worked surfaces show only the technological signatures left by the forming tool.
However, both the cases guarantee mean roughness values typical of surfaces worked by machining or hand grinding, according to ISO 4287/1.
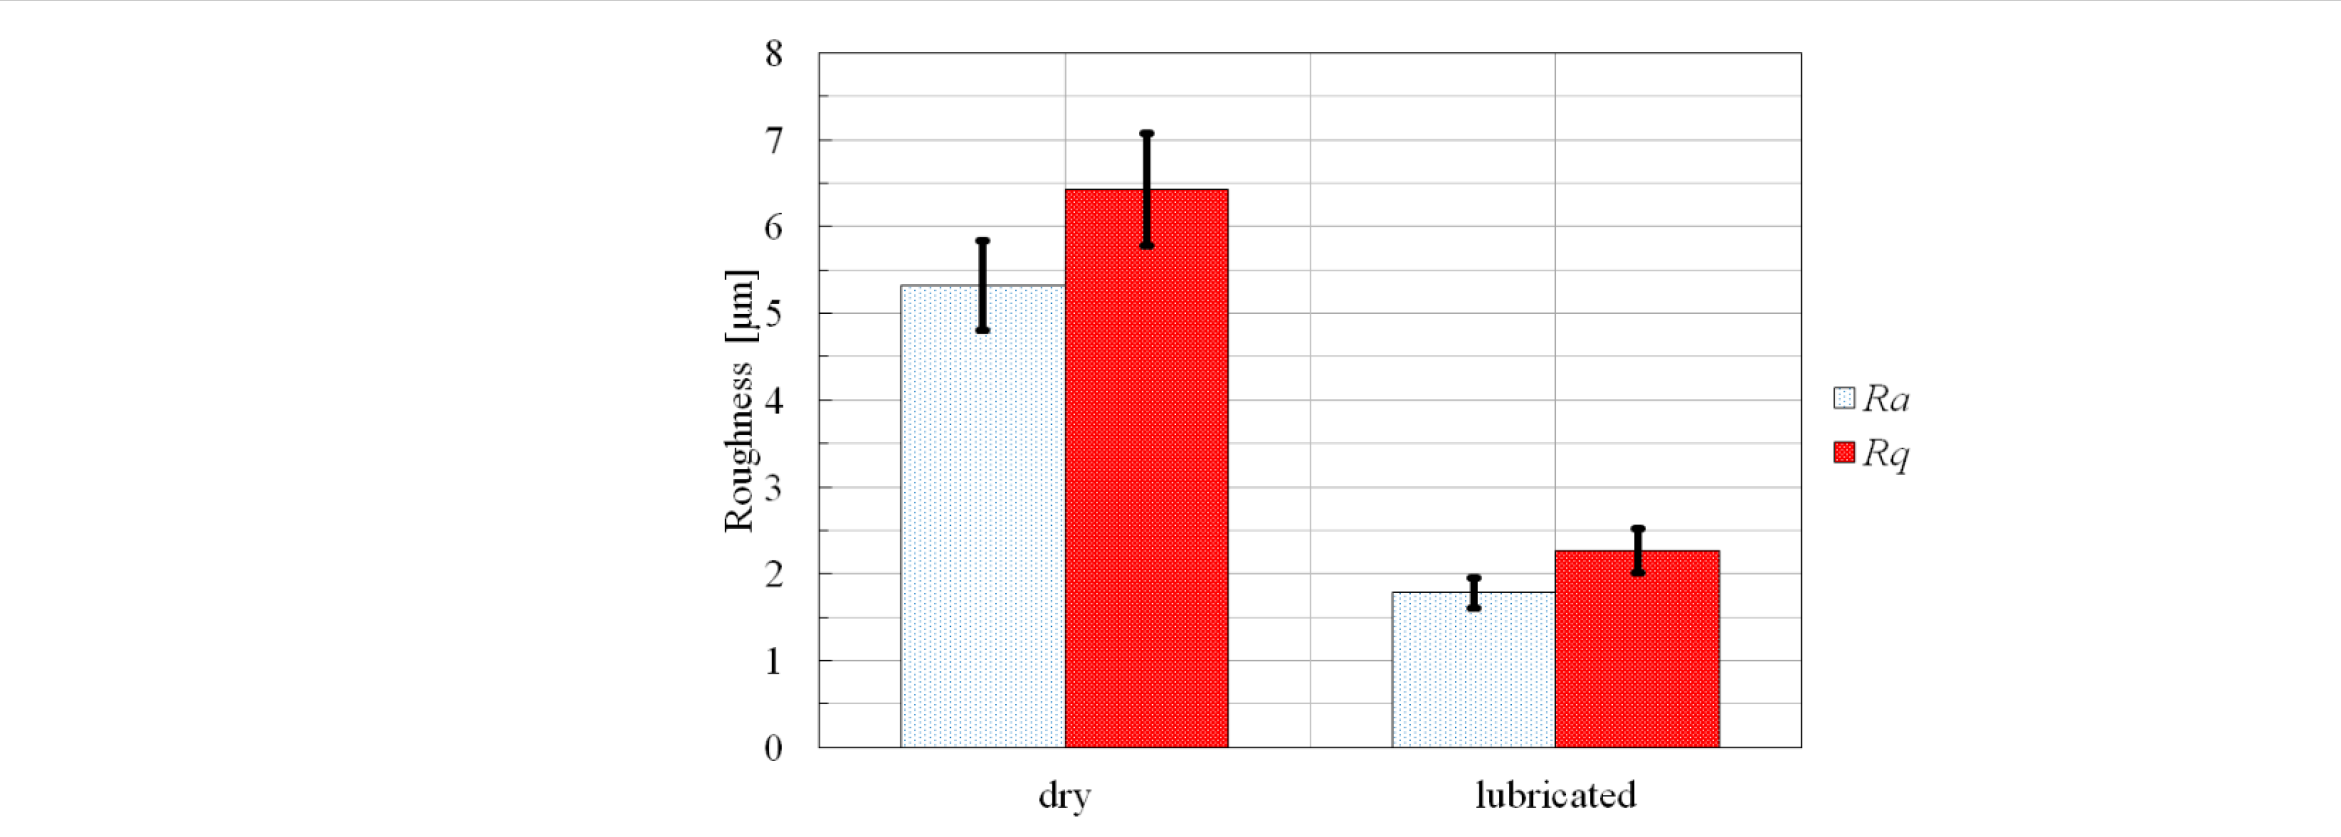
Fig. 6. Roughness of the worked surfaces under dry and lubricated contact conditions.
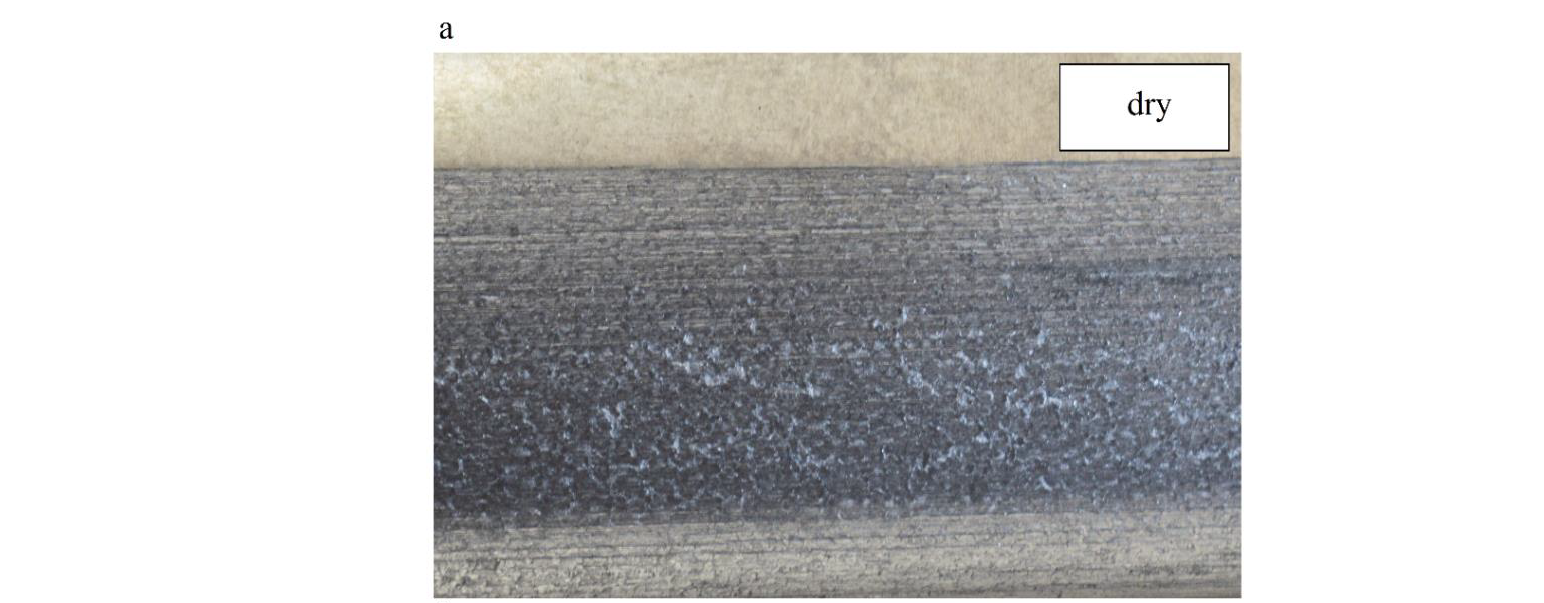
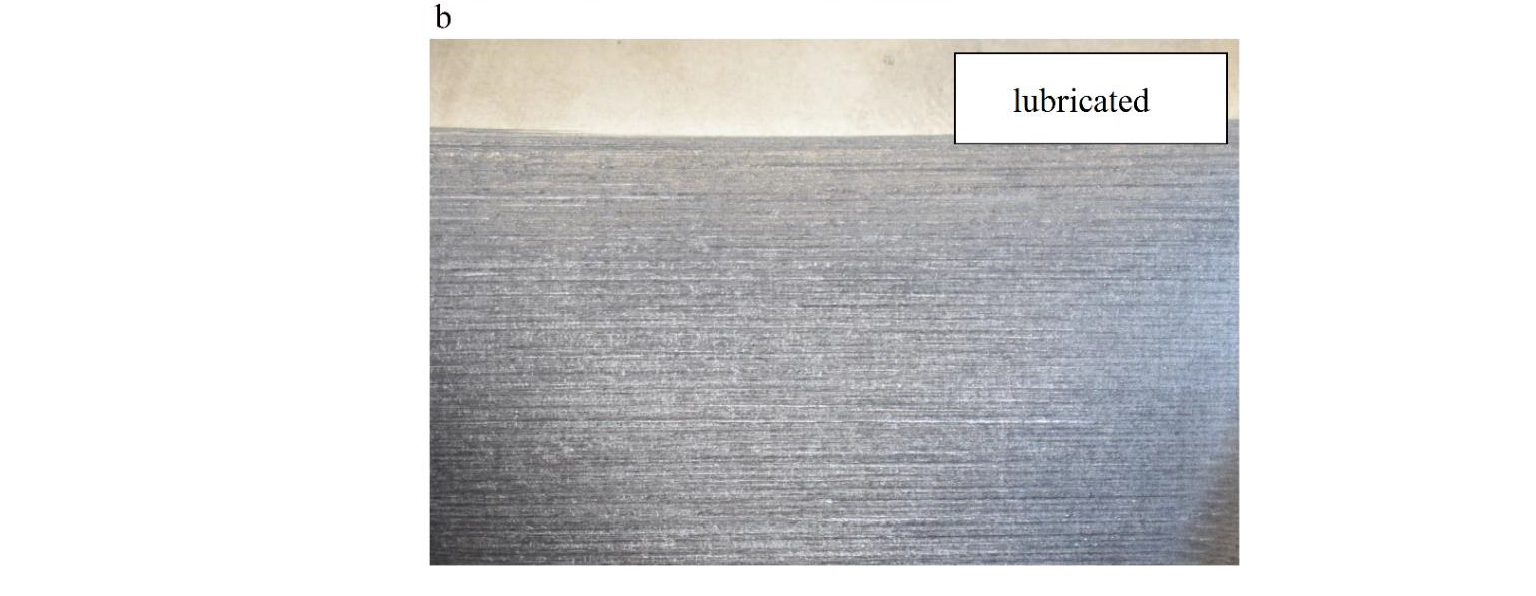
Fig. 7. Worked surfaces of (a) dry and (b) lubricated sheets.
4 Conclusions
This work dealed with the investigation of the influence of the contact conditions between the forming tool (a common hemispherical tipped steel stylus) and the sheet, when working pure Niobium by single point incremental forming; following the indications of a previous experimental work of the authors, the influence of the lubrication of the sheets with industrial grease was examined. The experimental campaign, involving the manufacturing of fixed slope angle square pyramid frusta, highlights that the process, when carried out without using any lubricant, involves severe contact conditions that translate into higher and more irregular forming forces lied to friction. This results in surfaces affected by galling, with a consequent worsening in terms of surface quality (roughness values more than doubled, compared to the sheets lubricated with grease); in addition, this can undermine the good carrying out of the process, involving the premature and unexpected occurrence of failures.
Future works can consider the investigation of the features yet analyzed in this study and the evaluation of the formability limits of Niobium sheets incrementally formed under different tool/sheet contact conditions, obtained by varying the lubrication and the forming tool typology. Moreover, it can be of interest to draw up an experimental campaign useful for determining the mechanical behavior of the Niobium by varying the strain rate and the friction coefficient of the tool/sheet contact under high pressure levels, typical of the incremental sheet forming, in order to implement a FE model and to quickly analyze the effects of the different parameters involved in the process itself.
Acknowledgements
The authors want to acknowledge the Agreement KN3012/GEN between CERN and University of Naples Federico II.
