Introduction
With the worldwide effort to reduce energy consumption and carbon dioxide (CO2) emissions, the lightweight construction trend, particularly relevant for the transportation industry, is gaining in importance [1]. Reduction of mass while maintaining high performance leads to an enhanced power density and downsizing of conventional combustion motors as well as an increased endurance of electric vehicles [2]. Furthermore, the reduced weight can be alternatively utilised for the integration of additional components, e.g. sensors and cameras, which are required for autonomous vehicles, without increasing vehicle weight.
Lightweight design can be realised using different strategies. The existing approaches of substitution and structure redesign with conventional mono-materials have reached their limits [3].To overcome material-specific restrictions and to fulfil the conflicting requirements such as high strength, low mass, compact design and improved stiffness, the development of advanced manufacturing technologies is of great importance for both research and industry. In this context, multi-material design offers a promising approach for the production of application-optimised components, where the material arrangement can be tailored in accordance with the local requirements and the operational conditions [4]. At industrial scale, this method is widely used in sheet metal forming utilising technologies such as tailored blanks, clinching or clad rolling [5]. In contrast, only a limited number of investigations on this topic exists for bulk metal forming (i.a. forging).
Depending on the process step order, forging of hybrid components can be divided in two types. The first one combines forming and joining in a single process step and is called compound forging. The key challenge of this method is to achieve a uniform joint along the interface zone between the raw parts. The resulting joint quality depends on process-related parameters, the initial and final geometry as well as the sample preparation. Increasing forming temperature, relative movement under pressure and enlargement of contact surfaces have a positive effect on the bond quality [6]. Oxide scale formation at elevated temperatures and non-uniform process parameters when forming of complex geometries (e.g. strain) may counteract the bond formation. In this case, the second method called hybrid forging, which deals with the forming of previously joined workpieces, can be advantageous to ensure a sufficient bond quality along the entire interface zone. In the following, several existing case studies investigating this method are given.
Frischkorn et al. investigated the forming of coaxially and sequentially arranged bi-metal workpieces fabricated by deposition and friction welding, respectively [7]. The upsetting tests demonstrated that a joining zone can be formed without any defects or separations. In dissimilar combinations (e.g. steel-inconel), the plastic deformation of materials with higher strength was insufficient due to differing material flow behaviour when forming at similar temperature. Domblesky et al. conducted axial and side compression tests of friction-welded workpieces with serial arrangement made of same-material and bi-material combinations (copper, steel, aluminium) [8,9]. The specimens demonstrated good formability: same-metal-combinations showed a uniform deformation and the material flow was similar to monolithic materials; by forming of dissimilar combinations, the deformation took place primarily in the lower strength material outside the joining zone. Klotz et al. investigated the isothermal forging of hot isostatically pressed (HIP) extruded profiles made of two different Ni-based superalloys to gas turbine discs. [10]. It was found that the bonding quality after forming is affected by the initial state of the hybrid preforms depending on process parameter of the HIP process such as temperature, pressure and process time. The formed specimens demonstrate a finer microstructure due to recrystallisation processes at hot forming temperatures. Förster et al. investigated a process chain with a two-step forging process for coaxially arranged aluminium workpieces with magnesium core previously joined by co-extrusion [11]. After forging, the magnesium core was completely enclosed in aluminium without cracks, even on the cross-section surfaces that were initially aluminium-free. In this region, no metallurgical bonding was observed, while the joint achieved by extrusion remained intact. The forming of previously joined workpieces is also a focus of the Collaborative Research Centre (CRC) 1153 - Tailored Forming, which investigates various process routes combining different joining and forming technologies [12]. In different demonstrator parts such as bearing bushings, bevel gears and shafts, it was shown that completely new joining zone geometries with modified structures and mechanical properties can be achieved [13,14].
Inspired by a suspension control arm, the present paper introduces two possible forming concepts for the production of a linear symmetric system demonstrator consisting of a steel reinforcement element and an aluminium matrix within the Tailored Forming process chain (Fig. 1). Compared to the coaxially arranged components investigated before [12], the considered geometry has no complete form closure and the bond is mainly formed by material bonding. To produce the required workpiece geometry designed with accordance to the load conditions, a lateral angular co-extrusion (LACE) process will be used in the future. Subsequently, the hybrid workpieces needs to be formed to the final geometry through a forging process. In order to prove a sufficient forming behaviour of the hybrid workpieces, two possible forming concepts were numerically investigated with regard to the material distribution. Moreover, a finite element (FE)-based die stress analysis was carried out to avoid tool damage. The results of this study will be used in the further development of the Tailored Forming process chain.
Figure 1. Hybrid system demonstrator (schematic).
1 Methods
In order to predict the forming behaviour of the demonstrator part in the forging process, numerical investigations with the commercial FE software FORGE NxT 1.1 (Transvalor S. A., Mougins, France) were performed. For this purpose, the forging tools for two potential forming strategies were designed and subsequently evaluated by means of the FE-analysis. The first forming strategy represents an open-die forging concept, which is typically characterised by the formation of flash around the part Fig. 2 (a). One of the advantages of this process is that the flash can compensate excess material volume. The material flow can be controlled through the geometry and roughness of the flash land. The second process is carried out in a closed die and therefore represents flashless forming with a prevailing isostatic stress state, see Fig. 2 (b). This process allows for near-net-shape forming but requires a precise volume of initial workpieces. An elasto-plastic material model was used to calculate the material behaviour within the hybrid workpieces shown in Fig. 2 (c). The workpiece is a section of a co-extruded profile consisting of a V-profile made of steel 20MnCr5 (AISI 4820 / 1.7147) filled with aluminium alloy EN AW-6082 (3.2315). The heart-shaped form of the profiles is based on the geometry of the extrusion tools [15].
Fig. 2. Numerical models of the two different die concepts: (a) open-die concept, (b) closed-die concept and (c) geometry of the hybrid workpiece.
The flow curves for the hybrid billet were implemented as a function of strain, strain rate and temperature. The material characterisation is described in detail in [16]. The multi-material modelling technique, which is provided in FORGE, was used to assign the two different material properties behaviours for the steel 20MnCr5 and the aluminium alloy EN AW-6082 in one component. This modelling technique is based on the definition of subdomains within the billet whereby each subdomain can represent a different material. The material models differ in characteristic parameters like the young’s modulus, the poisson’s ratio, thermal behaviour and the flow curves. The workpiece geometries used for both forming concepts only differ in height. The sections of the co-extruded profile for the closed-die concept have an initial height of 15 mm. A higher workpiece volume is required for the open-die forming because of flash formation. Therefore, the workpiece height was set to 19 mm in this case. The resulting amount of volume elements varies according to the different dimensions of the workpiece bodies and contains approximately 150,000 elements for the closed-die concept and 175,000 elements for the open-die concept. In both cases, tetrahedronal linear elements were used. In order to achieve sufficient deformation of both materials at the same time, a tailored temperature distribution is required [17]. The solidus temperature of aluminium, which is about 570 °C for the alloy 6082, limits the maximum temperature in the joining zone [18]. At the same time, it should exceed 450 °C, in order to prevent blue-brittleness effect caused by dynamic strain aging at low forming temperatures on the steel side [19]. In previous works, the required temperature gradients were realized using the skin-effect in induction heating [20]. Previous results achieved with a similar material combination for coaxially arranged workpieces were applied to the heating of heart-shaped workpieces [21]. In a preceding numerical investigation, a thermal gradient was set in the hybrid billets. In the steel section, a maximum temperature of 600 °C was reached. The maximum temperature of aluminium amounts to 500 °C. In Fig. 3 (a) the temperature distribution of the hybrid workpieces is shown. The black line represents the outline of the steel section within the hybrid workpiece. Since the height of the workpieces differs between open- and closed-die concepts, the initial temperature distributions also show slight differences (cf. Fig. 3). The initial temperature of the tools was set to 250 °C.
Fig. 3. Initial temperature distribution of the hybrid semi-finished product for (a) the hybrid billet for the closed concept and (b) the open die concept
The tools of the two different forming concepts were modelled as rigid bodies to limit the computation time. The heat-resistant steel X38CrMoV5-1 (AISI H11 / 1.2343) was used as tool material since it is typical for forging dies. Additionally, a die stress analysis was carried out for both forming concepts. An uncoupled analysis was performed for the upper and lower die each. According to resulting material flow, the two die concepts were evaluated. In addition, the resulting equivalent stresses (v. Mises) and the 1st principal stress were considered for the evaluation of the concepts.
The feasible load of the forging process is limited due to material-specific properties of the forging dies. The 1st principal stress indicates risk of crack initiation and should not exceed the tensile stress of material. The equivalent stress show possible plastic deformation and, therefore, is limited to the yield stress, where the plastic deformation starts [22]. These mechanical properties depend on the initial state and heat treatment of the material [23]. For the heat-resistant steel X38CrMoV5-1 with the initial hardness of approximately 54 HRC, the critical value of yield and tensile strength is respectively about 1600 MPa and about 1800 MPa at room temperature [24]. A pre-heating to 300°C leads to a decrease of this values to approximately 1400 MPa as well as 1550 MPa, respectively [25].
2 Results
2.1 Material flow
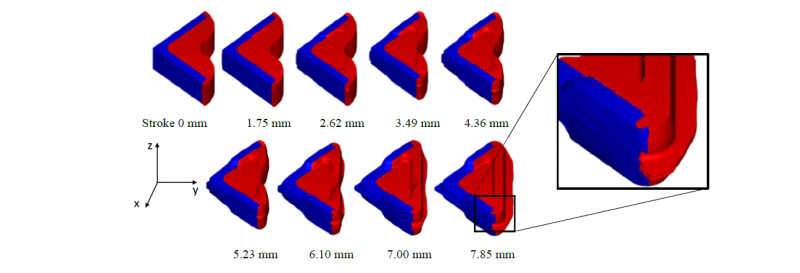
The numerical results of the open-die concept are depicted in Fig. 4. The forming process is depicted in nine stroke steps, starting from 0.0 mm until 7.85 mm. The blue area represents the steel section and red is the aluminium section. Beginning at stroke 2.62 mm the steel arm is simply pressed into the cavity, with the major deformation in the aluminium section in the centre of the workpiece. The original heart-like shape of the hybrid co-extruded profile is transformed into a triangle shape towards the end of the forming process.
Fig. 4. The forming process of the open-die concept in nine stroke steps
At stroke 7.85 mm the forging process is finished and the flash, which is a typical feature of the forming process, is in its final shape. The forming of the flash begins at a stroke of 5.23 mm. The beginning of the formation of the flash results in a significant increase of the process forces. Here the aluminium flows over the steel section. At the end of the forming process, a form fit can be observed at the overflowed ends of the arm. The form fit is presented in detail on the right side of Fig. 4.
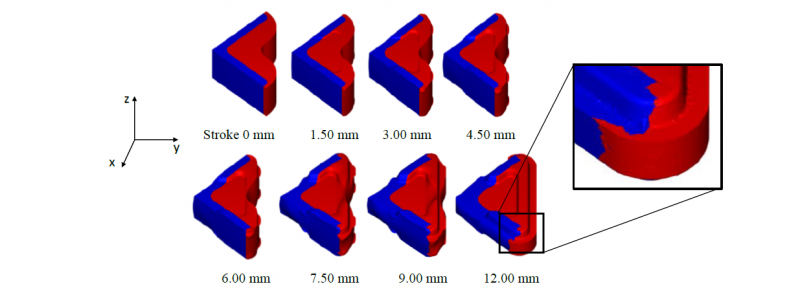
In Fig. 5. The results of the numerical forging process with a closed-die concept are presented. The forming process is depicted in eight equidistant steps of the stroke. The blue-coloured area represents the steel section and red represents the aluminium section. The forming process itself is very similar. At the beginning, the arm is pressed into the aluminium section. In contrast to the open-die concept, the material flows against the inner wall of the lower die. While the outer contour is completely filled at stroke 12.00 mm, the steel section is not entirely formed at this stage. High process forces occur at the end phase of the forming process due to the complete filling of the die and the deformation of the stronger steel portion. Again, a form fit can be observed at the ends of the arm, which is depicted in detail on the right side of Fig. 5.
Fig. 5. The forming process of the closed- die concept in eight stroke steps
2.2 Die stress analysis
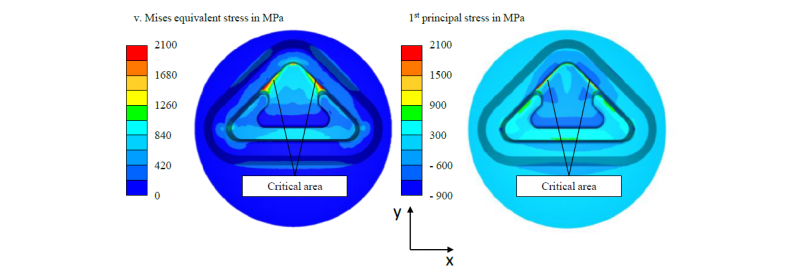
In Fig. 6, the results of the die stress analysis of the open-die concept are depicted. Because of the symmetry of the demonstrator, the upper and lower dies are exposed to identical loads and, therefore, only the results of the upper die are presented. First, the resulting v. Mises stress is discussed, which represents the beginning of plastic flow when the material-specific yield strength is exceeded. The highest v. Mises stresses are detected in the areas marked as critical in Fig. 6 where the steel section of the hybrid workpieces is formed. When using an open-die concept, the resulting v. Mises stresses indicate, that the tool material 1.2343 with a hardness of 54 HRC can withstand the loads resulting from the forging operation throughout most sections of the die. The second investigated parameter was the 1st principal stress, which shows the distribution of tensile and compressive stress within the tool. If high tensile stresses occur the risk of cracks and therefore a tool failure is possible. Here again the highest recognised tensile stresses are detected in the areas marked as critical in Fig. 6. The critical loads in the notch areas are a result of the low steel workpiece temperature causing an increased flow stress and the geometrical weak spot in the notch. Further process or geometrical improvements are necessary to reduce the loads in the notch area below the tool material yield strength of 1550 MPa [25].
Fig. 6. Die stress analysis of the open-die concept, (a) v. Mises equivalent stress distribution and (b) 1st principal stress distribution
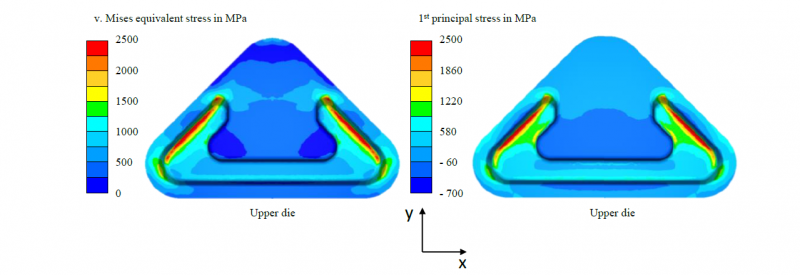
The tool analysis of the closed-die concept is divided into the analysis of the upper die and the lower die. The results of the upper die of the closed-die concept are presented in Fig. 7. The indicators are again the v. Mises stresses and the 1st principal stresses. Closed-die hot forging provides a near-net shape component, which requires no subsequent cutting steps, but on the other hand, the material cannot slip out of the die through a flash. Therefore, the pressure within the die increases significantly in the final filling stages of the forming process as it is pressed against the cavity walls. Because of that, the stresses within the tool increase drastically, as depicted in Fig. 7. The v. Mises stresses are higher than 2500 MPa in critical areas of the tool, which indicate plastic deformation and can therefore lead to tool failure. The results of the calculated 1st principal stress also show that tool failure of the upper die is probable because tensile stresses above 2500 MPa occur. Just as in the open-die concept, the high loads are caused by the low steel forming temperature and the notch geometry in the critical areas. Further improvement is required here as well.
Fig. 7. Die stress analysis of the upper die of the closed-die concept, (a) v. Mises equivalent stress distribution and (b) 1st principal stress distribution
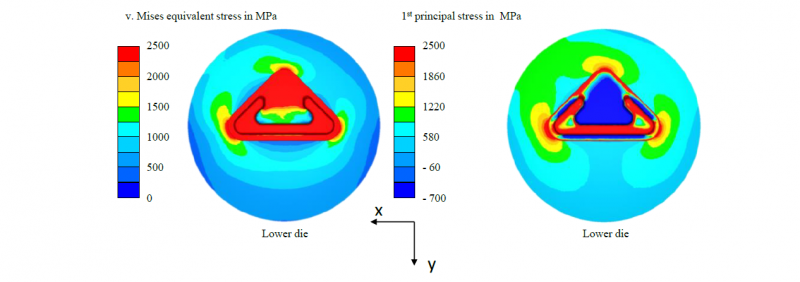
In Fig. 8, the results of lower die of the closed-die concept are depicted. The inner boundary of the cavity is used as a forming element for the hybrid workpiece. Therefore, the workpiece is in contact with the inner wall of the lower die transferring additional forces into the die. As the hybrid co-extruded section is symmetrical in z-direction, the arms are also already filled, although the forming process is not yet completed. This leads again to very high loads in the lower die. The distribution of the v. Mises stress indicates that plastic deformation of the lower die will occur and tool failure is likely over major parts of the tool surface. In the presented manufacturing concept, the mass pre-distribution of the hybrid co-extruded profile is therefore not suitable for a closed-die concept. The left and right wing of the arm are completely filled with material, while the forming process is still ongoing. Further improvements are unlikely to be effective enough to prevent plastic deformation and major cracking throughout most of the cavity surface. Based on these results of the die stress analysis of the upper and lower die the manufacturing of this hybrid system demonstrator by means of Tailored Forming with the presented closed-die concept is not recommended.
Fig. 8. Die stress analysis of the lower die of the closed-die concept, (a) v. Mises equivalent stress distribution and (b) 1st principal stress distribution
3 Summary and outlook
The present paper introduces a method for the production of a linear symmetric system demonstrator from co-extruded steel-aluminium profiles using Tailored Forming technology. With the focus on the forming stage, two different forging strategies (open-die and closed-die forging) were designed and numerically investigated. It was shown that both strategies ensure a satisfying material flow with regard to the material distribution in the final part. However, the forming of hybrid workpieces with an expected temperature profile, where steel is at the lower limit of the warm forming range, results in high stresses in the lower die in the case of a closed-die concept. The elevated process loads increasing in the final die filling stages can lead to failure of the forging tools, which is not permitted for reliable forming results. In contrast, the forging tools are exposed to lower stresses during the forming with an open-die concept. With slight further geometrical improvements in the notch area, where minor critical stresses were observed, the open-die forging concept can be implemented in experimental forging tests. Based on the results of the virtual process design, it was possible to numerically determine process limits and evaluate different concepts to ensure a robust forging process of steel-aluminium pre-forms in the later stages of implementation. This numerical approach allows a parallel development of the presented forging process and the preceding co-extrusion process before experimental validation with actual co-extruded pre-forms. In future work, the forming tools will be manufactured to carry out the forging tests with joined co-extruded workpieces. The forging results in general depend on the quality of the co-extruded profiles, which needs to be additionally investigated in the future as well in order to improve the FE-model of the presented forging process.
Acknowledgements
The results presented in this paper were obtained within the Collaborative Research Centre 1153 “Process chain to produce hybrid high-performance components by Tailored Forming” (project number: 252662854, subprojects B2 and C1). The authors would like to thank the German Research Foundation (DFG) for the financial and organisational support of this project.


