1 Introduction
Rotary swaging is an incremental open-die forging process used for the production of lightweight components from tubular semi-finished products. In this process, the diameter of the components to be manufactured is reduced. The components produced in this way are used in the automotive industry as axle shafts and steering spindles [1]. The process is also used in the production of micro components. In combination with the non-cutting and thus resource-efficient production, as well as the lower process forces compared to conventional forming processes [2], the process contributes to sustainable production technology.
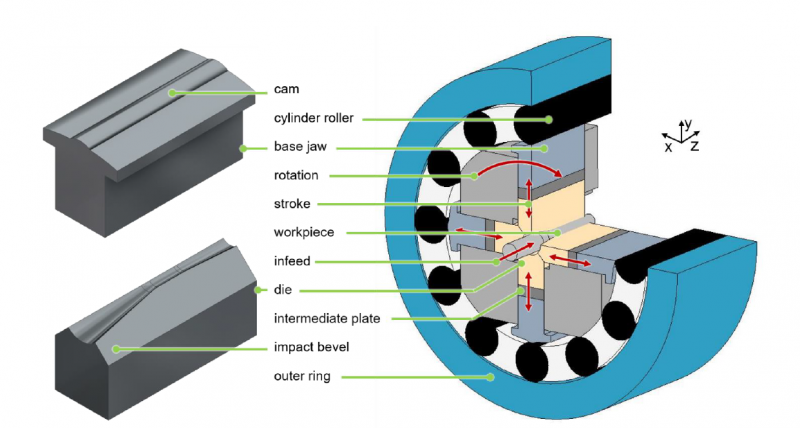
During infeed rotary swaging, which is shown schematically in Fig. 1, the incremental forming process takes place in a mainly radial direction. During the process, the dies rotate around the workpiece and simultaneously strike towards the center of the swaging axle, while the workpiece is fed axially into the swaging unit. The simultaneous closing of the dies generates forces, which act on the workpiece and lead to plastic deformation. The radial stroke of the dies is generated by the passing of the base jaws (with the cam) on the cylindrical rollers. The stroke height is limited by the contact of the pitch of the dies, which meet each other. Due to the height of the pressure column, consisting of base jaw, intermediate plate and die, an individual closing pressure and a corresponding closing time are generated.
During the process, the workpiece is formed by many successive steps and the formed semi-finished product volume is subjected to various loads. The material does not flow only axially or radially, but a complex multidimensional material flow takes place, which is not evenly distributed [3]. The material is exposed to stretching and compressions of different magnitudes [4]. Thus, the material flow has a certain influence on the microstructure and the associated properties of the semi-finished product.
Fig. 1: Infeed swaging unit of an internal rotor machine with 4 dies in quarter cut
This forming technique is at present mainly designed with regard to the geometry that can be achieved in industrial applications. Thus, components with narrow diameter tolerances of ± 0.01 mm and high-quality surfaces with roughness depths ≤ 0.5 μm can be produced [5]. The achievable geometric qualities, however, depend on the initial state of the semi-finished product and the reduction to be carried out. Quality characteristics such as surface finish are strongly determined by the feed rate of the workpiece [6], whereas the final diameter is strongly influenced by the maximum reduction of the diameter [7].
Besides the determination of the geometry, the material flow is responsible for the development of the microstructure. Rotary swaging has a strong influence on microstructure development and a significant grain refinement can be achieved [8]. Furthermore, depending on the alloying element in the material, phase transformation into microstructure may even occur [9]. Various measures can be taken to influence the material flow and thus the microstructure and the resulting component properties. On the one hand, the geometric design of the rotary swaging dies allows for an influence. An adapted basic shape of the dies [10] as well as a changed design of the reduction zone [11] and a slight geometric change such as structuring can strongly influence the material flow [12]. On the other hand, the material flow can be influenced during the process by adapting the process parameters. In addition to the influencing factors already mentioned, such as workpiece feed and maximum reduction, the relative motion between die and workpiece (stroke following angle) [10], friction [12] and process kinematics [13] also influence the material flow. The intrinsic mechanical properties such as hardness [14], strength [15] and residual stress [16], are the main factors that are investigated. In most cases, these parameters show increased values due to work hardening and a favorable fiber flow in the workpiece [17].
Investigations on electrochemical properties such as corrosion resistance were also carried out. According to the study of Minárik et.al. a stronger reduction of the diameter during rotary swaging of magnesium rods reduced the corrosion resistance, which they attributed to microcracks [18]. Chuvil'deev et al. showed that titanium processed by rotary swaging shifted its corrosion mechanisms and thus caused more intergranular corrosion instead of pitting corrosion [19]. Abdulstaar et. al. investigated the rotary swaging of aluminum and found an increase in corrosion resistance [20]. Gholami et. al. discovered that in electrochemical impedance spectroscopy, a small reduction in diameter reduces the polarization resistance of copper, whereas a large reduction in diameter increases the polarization resistance [21]. Bösing et al. showed for stainless steel X5CrNi18-10 (AISI 304) that an increase in the feed rate of the workpiece changes the microstructure and thus positively effects the corrosion resistance [22], which is attributed to the formation of martensite [23].
In this study, the principle of corrosion resistance of mild steel E355 (EN 10305-1) was analyzed after rotary swaging with the same nominal strain but different process settings. Especially higher forming increments per stroke and the additional application of shear strain by eccentric rotary swaging were examined. The introduced methods are assumed as prospective candidates for the industrial production of parts that provide higher durability without further anti-corrosion treatment.
2 Experimental setup
2.1 Material forming
Rotary swaging experiments (machine HE-32, company Felss) were carried out using conventional swaging dies with a die angle of α = 10° and an inner circle diameter of 15 mm. In this investigation, cold-drawn steel tubes E355 (EN 10305-1) with an initial length of L0 = 300 ± 0.85 mm were used. The initial diameter was d0 = 20 ± 0.30 mm and the wall thickness was s0 = 3 mm (specified by the manufacturer). Some workpieces were heat-treated in a vacuum furnace at 890 °C for 5 hours to eliminate existing residual stresses and work hardening. The remaining workpieces were processed without heat treatment in the initial cold drawn state. All samples and their process parameters are summed up in Table 1.
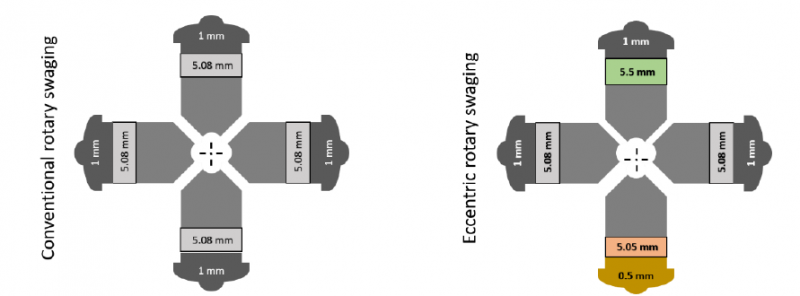
The stroke frequency was kept constant at fst = 35 Hz and the feed rate was set to vf = 1000 and 2000 mm/min. All specimens were fed 130 mm inside the swaging head and were processed at room temperature using mineral oil Condocut KNR 22 for lubrication. During conventional rotary swaging, all intermediate plates had the same thickness Tp = 5.08 mm and the stroke height was set to hT = 1 mm for all dies. In the setting for eccentric rotary swaging, two intermediate plates were changed, see Fig. 2. The upper plate thickness was set to Tpu = 5.5 mm and the lower plate was set to Tpl = 5.05 mm. Furthermore, the stroke height for the die with the thinnest plate was reduced to hTl = 0.5 mm by changing the base jaw.
|
Sample |
Procedure |
Pre-treatment |
Feed rate mm/min |
|
CnH1 |
Conventional |
no Heat treatment (cold drawn) |
1000 |
|
CH1 |
Conventional |
Heat treatment |
1000 |
|
CH2 |
Conventional |
Heat treatment |
2000 |
|
EnH1 |
Eccentric |
no Heat treatment (cold drawn) |
1000 |
|
EH1 |
Eccentric |
Heat treatment |
1000 |
|
EnH2 |
Eccentric |
no Heat treatment (cold drawn) |
2000 |
Table 1. Rotary Swaging process parameters
Fig. 2: Arrangement of plate thickness and stroke height for conventional and eccentric rotary swaging
2.2 Electrochemistry
All electrochemical measurements were carried out at room temperature in a standard three-electrode cell using a Metrohm Autolab potentiostat with the PGSTAT204 module. As counter electrode served a platin electrode and as reference electrode an Ag/AgCl (3 M KCl) electrode, while the investigated samples acted as working electrodes. The samples were embedded with two-component adhesives in a PVC holder. Prior to each measurement, the samples were wet polished with SiC grinding paper (p2000).
The Linear Sweep Voltammetry measurements were performed in 0.1 M phosphate buffer (pH 7.5) containing 0.1 M NaCl solution. This solution enables a better distinguishable passive area [24]. Each scan started at -0.8 V and was increased up to 0.2 V with a scan rate of 0.001 V.
The Linear Sweep Voltammetry measurements of the samples enable the determination of different corrosion specific electrochemical values. These are the corrosion potential and the corrosion current determined by the Tafel method, the minimal current in the passive area and the breakdown potential at which active corrosion due to metal dissolution appears and the sample is no longer protected by a passive film.
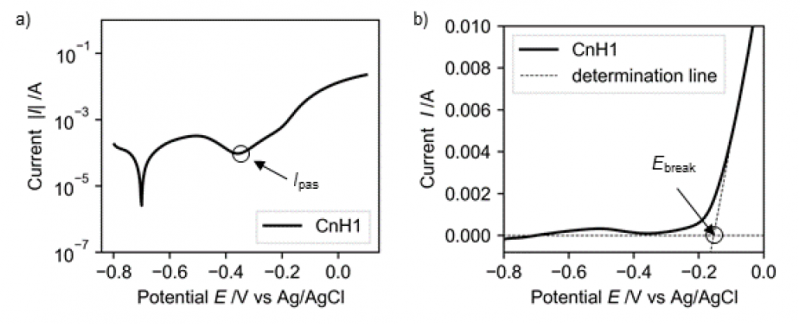
From the logarithmic presentation of the Linear Sweep Voltammetry measurements, the corrosion potential and the corrosion current can be determined. Both values seem to be unaffected by mechanical treatment (not shown). The minimum current in the passive region Ipas and the breakdown potential can also be extracted from the Linear Sweep Voltammetry measurements. While Ipas can be easily determined from the logarithmic presentation (Fig. 3a) the breakdown potential is determined from the non-logarithmic presentation of the measurements (Fig. 3b). The linear slope of the current versus potential curve is extended and the intersection with a line at a current of 0 A represents the breakdown potential. Due to an altered microstructure both electrochemical values can change. Grain refinement can for example lead to a better passivation under passivating environment which reduces the passive current and increases the breakdown potential [25]. However, the influence of microstructure on corrosion is still a matter of debate and a comprehensive description of the effect of single microstructure changes on the corrosion behavior is still missing.
Fig. 3: Linear Sweep Voltammetry of sample treated with conventional rotary swaging with a feed rate of 1000 mm/min and no pre-heat treatment (CnH1); a) logarithmic presentation for the determination of minimal current in passive area Ipas; b) non logarithmic presentation for the determination of the breakdown potential Ebreak
3 Results and Discussion
3.1 Microstructure
After rotary swaging, the geometrical features were analyzed. At first, the diameter and the length of the workpieces after forming were measured. The heat treatment as well as the feed rate influenced the final diameter slightly, while the change in the process kinematic lowered the diameter significantly. The workpieces produced with eccentric rotary swaging were on average 0.32 mm smaller in diameter. The highest elongation of the tube was observed by the conventional process of the heat-treated tube with the highest feed rate, ΔLCH2 = 28.9 mm. A lower feed rate led in the experiments to a smaller elongation. The new process kinematic, eccentric rotary swaging, resulted in the shortest tubes. Thus, for the low feed rate without a heat treatment the elongation was only ΔLEnH1 = 21.3 mm. The influence of the heat treatment shows that softer i.e. annealed material featured a higher elongation independent of the process kinematics.
The roundness deviation was measured with a Taylor-Hobson Talyrond 252. The typical influence of the feed rate could be observed as a higher feed rate led to a higher roundness deviation. Thus, the best roundness was reached for conventional rotary swaging by a feed rate of 1000 mm/min and for the not heat-treated workpiece, RONtCnH1 = 4.5 μm (least square cycle). A change just in the heat treatment can double the roundness deviation. A change in the process kinematic from conventional to eccentric rotary swaging resulted for the low feed rate and the not heat-treated workpiece also in the double value of the roundness deviation. But an increase of the feed rate together with a change in the heat- treatment of the workpiece yielded to the worse roundness deviation of about RONtEnH2 = 52.8 μm with a high scatter.
In addition, residual stresses were measured at the surface of both initial and swaged tubes. The measurement procedure was equivalent as described by Ishkina et. al. [16]. The delivered initial cold drawn material showed axial surface residual stresses of about -114.7 MPa and a half full width at half maximum (FWHM) value of less than 2. After the heat treatment, the amount of residual stresses reduced to about 7 MPa and also the FWHM lowered to less than 1. After rotary swaging of tubes without mandrel, the residual stresses and FWHM were also measured. The residual stresses of all annealed samples showed a high fluctuation from tensile to compression stresses. For the not heat-treated samples, high compression stresses were reached. For example, the CnH1 reached about -250 MPa and the EnH1 about -280 MPa. The FWHM which correlates generally with the hardness of steel shows the lowest value for the initial annealed state. After conventional rotary swaging, much higher values for the FWHM were measured. Independent of the pre-treatment and the feed rate a value of about 2.385 was found. However, the new process kinematic featured a bit lower FWHM values. Also, the feed rate showed no significant impact on the value of FWHM of about 2.02.
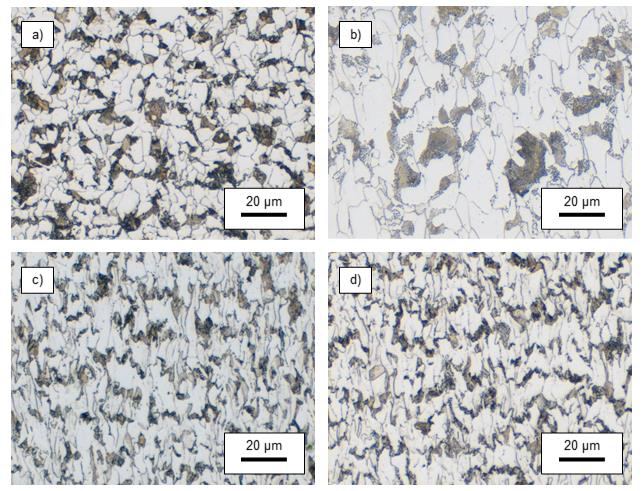
Fig. 4: Cross section view of microstructure of rotary swaged samples; a) as received sample AR; b) sample EH1; c) sample EnH1; d) EnH2
3.2 Corrosion behavior
The microstructure of the untreated sample showed some differences to the rotary swaged samples depending on the pre-treatment and the process parameters during rotary swaging (Fig. 4). Prior heat treatment of the workpiece resulted in grain growth (Fig. 4b). The grain size of the received sample is approximately 3.8 μm, whereby the sample EH1 has a grain size in radial direction of 8.3 μm and in circumferential direction 4.1 μm. In contrast, samples without prior heat treatment showed distorted grains due to the rotary swaging, while the feed rate just show a slightly effect on the grain structure (Fig. 4c and 4d). The sample swaged with a feed rate of 100 mm/min has a grain size in radial direction of 5.0 μm and in circumferential direction 2.6 μm. The sample formed with the higher feed rate shows a slightly bigger grain size in radial direction of 5.7 μm and in circumferential direction 3.0 μm.
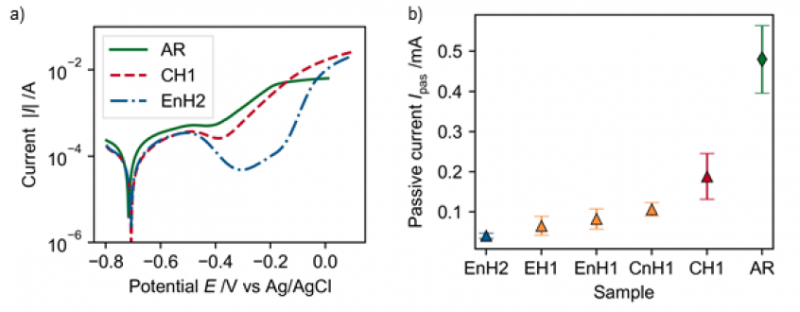
The Linear Sweep Voltammetry measurements of the samples showed a clear dependency on material treatment (Fig. 5a). The untreated sample showed the highest passive current Ipas compared to all other samples (Fig. 5b). The rotary swaging process led to a lower passive current whereas eccentric rotary swaging had a higher influence on the passive current compared to conventional rotary swaging. The passive current indicates the dissolution behavior of the samples in the passivated state, whereas a low passive current indicates slower dissolution and slowed down corrosion. Considering this, the material treatment caused an improvement of the corrosion behavior in terms of a decelerated material dissolution in the passivated state. Conventional rotary swaging produced a significant improvement of the passive current, whereas the not heat-treated sample CnH1 showed a lower passive current and thus better passivation compared to the samples with prior heat treatment (CH1).
Eccentric rotary swaging led to an even lower passive current and thus better protection of the passivated samples against corrosion. Between the samples with (EH1) and without prior heat treatment (EnH1) no significant differences were recognizable but an increase of the feed rate from 1000 mm/min (EnH1) to 2000 mm/min (EnH2) generated a further reduction of the passive current.
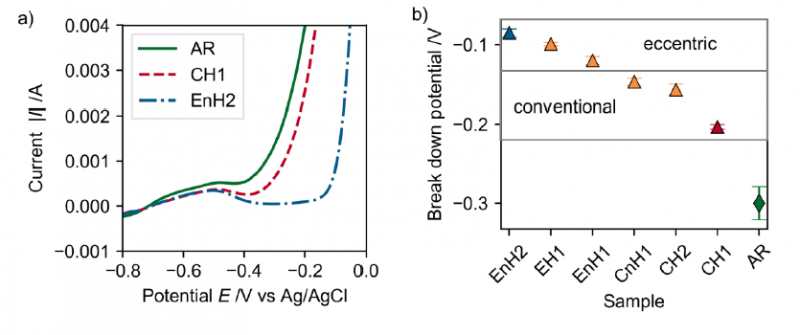
The comparison of the breakdown potential drew a similar picture (Fig. 6). The untreated (as received (AR)) sample showed the lowest breakdown potential and thus the earliest breakdown of the passive film due to corrosion. This is in very good agreement with the highest passive current and thus the worst passivation. Conventional rotary swaging caused an increased break down potential, whereas an increasing feed rate further increased the breakdown potential from -0.2 V for the sample treated with a feed rate of 1000 mm/min (CH1) up to -0.16 V for the sample with an increased feed rate (CH2). Similar to the passive current there was no significant change of break down potential due to the pre-treatment (Fig. 6b).
Eccentric rotary swaging led to a further increase of the break down potential beyond the changes due to conventional swaging. The observed trend of more pronounced effects due to an increased feed rate was also recognizable for the eccentric treatment. The eccentric rotary swaged sample with a feed rate of 2000 mm/min (EnH2) showed the highest breakdown potential and the best protection against corrosion. The total change of the breakdown potential due to eccentric rotary swaging compared to the untreated sample was around 0.2 V.
Fig. 5: Comparison of electrochemical behavior of rotary swaged samples regarding the passive current; a) Linear Sweep Voltammetry of three different samples for illustration of differences; b) Passive current in dependence of material treatment determined from Linear Sweep Voltammetry measurements
Fig. 6: Comparison of electrochemical behavior of rotary swaged samples regarding the break down potential by Linear Sweep Voltammetry; a) three different samples for illustration of differences; b) break down potential
In contrast to the grain size and structure, which was obviously unaffected by increasing the feed rate, the corrosion behavior showed significant changes due to changes of the feed rate. Furthermore, a prior heat treatment resulted in drastically modified grain size, while it did not seem to affect the corrosion behavior. This indicates that the reason for the improved corrosion resistance of the rotary swaged samples is not (exclusively) in the grain structure.
4 Conclusion
The microstructure and the electrochemical behavior of different treated mild steel samples were investigated by microscopy methods and Linear Sweep Voltammetry. The rotary swaging led to a distorted grain structure while a prior heat treatment prevented this effect and in contrast resulted in enhanced grain growth. The following conclusions were drawn:
-
Rotary swaging improves the corrosion behavior of mild steel due to
o Lowering the passive current
o Increasing the breakdown potential
-
Eccentric rotary swaging leads to better corrosion behavior compared to conventional rotary swaging
-
The corrosion behavior is improved by a higher feed rate during the process, independent of the process kinematic
-
Rotary swaging causes a distorted grain structure
-
Prior heat treatment results in grain growth and thus prevents the distortion of grains due to the rotary swaging process
-
Changes in observed microstructure (grain size and structure) cannot describe the electrochemical behavior completely.
In further studies, the microstructure of the swaged material with different process parameters will be investigated in more detail. Especially, the residual stresses and full width half-maximum will be examined further in connection with the electrochemical properties. Also, the electrochemical behavior will be measured locally resolved in the cross as well as in longitudinal section. Further analyze methods, i.e. impedance measurements, to investigate the different corrosions mechanism will be carried out. Thus, it will be investigated which microstructure changes alter the corrosion resistance and which mechanism determine these changes of the corrosion behavior. Finally, the microstructure and the electrochemical properties of the finally used component should be controlled by the rotary swaging process.
Acknowledgements
This research was funded by the German Research Foundation (DFG Deutsche Forschungsgemeinschaft) in the collaborative research center CRC 1232 “From coloured states to evolutionary structural materials” (sub-project 276397488) and within the sub-project (374789876, KU 1389/16-2) “Control of component properties in rotary swaging process” of the priority program SPP 2013 “The utilization of residual stresses induced by metal forming”
