1 Introduction
Machining of polymers becomes mandatory when the production volumes do not justify the cost of injection molds or extrusion dies, or when high dimensional accuracy of the part is strictly required [1]. Polymers of biomedical interest, as is the Ultra-High- Molecular Weight Polyethylene (UHMWPE), fall in the latter case, since low surface roughness and tight tolerances are required when parts made of these polymers have to be put in service. Nevertheless, especially in case of the UHMWPE, these characteristics are difficult to be attained since the UHMWPE very low elastic modulus and deformation ability significantly reduce its machinability.
Cryogenic cooling can represent a strategy to increase the UHMWPE machinability, since it helps in preserving the polymer mechanical strength during cutting, besides being an environmentally friendly medium. In the past, just one attempt was made to use cryogenic coolants for improving the UHMWPE machinability, whereas their use in machining other polymers is more diffuse. However, the only study about cryogenic cooling of UHMWPE [2] was about the effect of the workpiece pre-cooling on the cutting forces, chip formation and surface quality during machining: even if lower cutting temperatures favored the formation of smoother surfaces, such improvements were of lower impact compared to those provided by the tool rake angle variation and tool wear evolution.
In [3] cryogenic micro-machining of PolyDiMethylSiloxane (PDMS) was studied, finding that, within the cryogenic temperature regime, the cutting forces increased compared to those at room temperature, which favored a proper formation of a micro-groove pattern on the polymer surface. In [4] PolyMethylMethAcrylate (PMMA) was turned to manufacture intraocular lens with using compressed air and cryogenic coolant: when using the former, the machined part showed consistent tearings and waviness, whereas, when using the latter, it was transparent and free of defects. In [5], cryogenic turning was applied to Polyamide 6 as an alternative to flood cooling, leading to the formation of harder and smoother surfaces, regardless of the adopted cutting parameters.
On the basis of this literature review, cryogenic cooling appears to be an attractive alternative to dry cutting, but its effect on surface integrity must to be further evaluated, especially when applied to UHMWPE. Therefore, the present work aims at investigating the role of cryogenic cooling in affecting the surface integrity of UHMWPE when machined for biomedical applications. To this purpose, turning tests were carried out at three different levels of cutting speed, namely 200 m/min, 300 m/min and 400 m/min. Dry turning tests were also carried out for sake of comparison. Afterwards, the surface integrity of the cryogenic and dry cut samples was assessed in terms of surface roughness, crystallinity degree, and hardness. Finally, the mechanical behavior of UHMWPE was characterized by means of tensile tests carried out at different temperatures from -60°C to 50°C to explain the machining performances.
2 Experimental
2.1 UHMWPE
The material under investigation was the GUR1050™, a medical grade UHMWPE kindly donated by Orthoplastic™. Thanks to its high chemical stability, low moisture absorption, high resistance to abrasion, and self-lubricating properties, it is widely used for prosthetic implants, like knee or hip replacements [6]. GUR1050™ was purchased in form of a bar of 60 mm of diameter and 1000 mm of length. The material was received in annealed condition, which is a typical heat treatment used to increase the UHMWPE crystallinity degree as well as to give it an appropriate dimensional stability.
The thermal characteristics of UHMWPE were investigated using a DSC™200 differential scanning calorimeter. A heating-cooling-heating cycle was applied, during which the specimen was heated up to 260 °C with a heating rate of 10 °C/min and then cooled down with the same rate. Fig. 1 shows an exemplary DSC scan relative to the UHMWPE as-delivered condition, which highlights the salient temperatures, namely the crystallization temperature (Tc) equal to 115 °C and the melting temperature (Tm) equal to 135 °C. Since the available experimental equipment did not allow cooling below -100 °C, the DSC analysis could not provide information about the UHMWPE glass transition temperature (Tg), whose value was therefore assumed from literature equal to -110 °C [7].
Fig. 1. DSC scan of UHMWPE in the as-delivered condition.
2.2 Turning tests
The turning tests were performed on a Mori Seiki NL 1500 TM CNC lathe. The adopted cutting tool was a VCEX 110301L-F 1125 insert supplied by Sandvik Coromant™ characterized by a rake angle (α) of 5°30’ and corner radius of 0.1 mm.
The turning process foresaw two steps. After a roughing operation, a finishing pass was carried by using a depth of cut (d) = 0.25 mm and a feed (f) equal to 0.1 mm. Cutting speed and cooling conditions were set according to the experimental plan reported in Table 1.
Table 1. Experimental plan for the turning tests.
Two typologies of cooling conditions were evaluated, namely dry and cryogenic conditions. In the biomedical field reducing as much as possible the surface contamination is mandatory, therefore the former machining approach is the one usually applied since it avoids the contamination of the surface from cutting fluid residuals. From this perspective, cryogenic cooling can represent an alternative advantageous strategy. As a matter of fact, the cryogenic coolant does not leave any residual on the surface, which, in turn, results clean as if cut in dry condition, with, furthermore, the advantage of reducing the temperature at the tool chip-interface. Overall, the set-up for cryogenic cooling consists of a dewar, in which the liquid nitrogen (LN2) is stored, a vacuum insulated tube that transports the fluid to the cutting zone, as visible in Fig. 2a, and, connected to the vacuum tube, a specifically designed item that comprises two copper nozzles spraying liquid nitrogen on the flak and rake faces of the tool at the same time (Fig. 2b). A k- type ThermoCouple (TC) was placed on a hole inside the cutting tool to record the temperature during machining, as shown in Fig. 3c. The hole was manufactured by electro-discharge machining, with a diameter of 0.6 mm and far approximately 1 mm from the cutting edge. A LabVIEW™ based software was used to collect and process the thermal signals.
Fig. 2. Set-up for cryogenic cooling at different magnifications (a and b), and 3D model of the cutting tool with indication of the holes manufactured for the TC housing (c), scheme of the turning process evidencing the turned surface (d).
2.3 Surface integrity characterization
The surface finish was examined on three different random zones of the turned surface, schematically depicted on Fig. 2d, by using the Sensofar PLu Neox™ optical profiler with a 20x magnification Nikon™ confocal objective. The surface roughness (Sa) was estimated according to the ISO25178-2:2012 standard [8].
The machined samples were analyzed by means of DSC according to the procedure described in § 2.1. The percentage of crystallinity Xc was estimated from the DSC heating scan on the basis of Equation (1):
where ΔHm° is the melt enthalpy of the ideal 100% crystalline UHMWPE (290 J.g-1 ), and ΔHm the melt enthalpy resulted from the DSC analysis.
Shore D hardness measurements were also carried out to on the machined sample surfaces.
2.4 Tensile tests
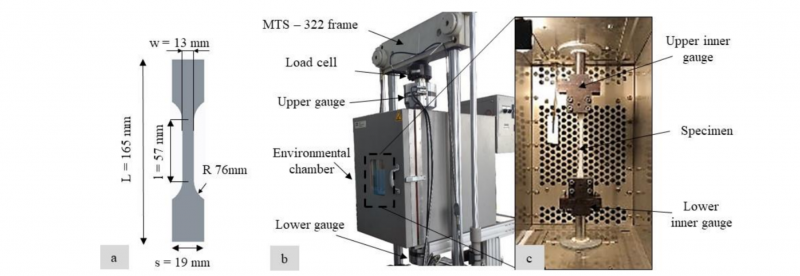
Tensile tests were carried out on an MTS™-322 hydraulic dynamometer equipped with an MTS-651 environmental chamber. The dog bone specimens, whose dimensions are shows in Fig. 3a, were water jet cut in accordance to Type I specimen of the ASTM D638-14 standard [9].
The tests were carried out at different temperatures, namely 25 °C, 50 °C, 100 °C, -20 °C, -40 °C, -60 °C by applying a constant strain rate of 4.75 s-1. The specimen heating was assured by the electric heating elements of the chamber, whereas the cooling by a continuous blowing of LN2 stored on an external dewar inside the environmental chamber. The overall mechanical testing equipment is shown in Fig. 3b, whereas Fig. 3c shows the specimen fixed on the dynamometer grips. More details about the experimental apparatus and procedures are given in [10].
Fig. 3. (a) Specimen geometry (all the dimensions are given in mm), (b) and (c) experimental equipment used for the tensile tests.
3 Results and discussion
3.1 Surface integrity
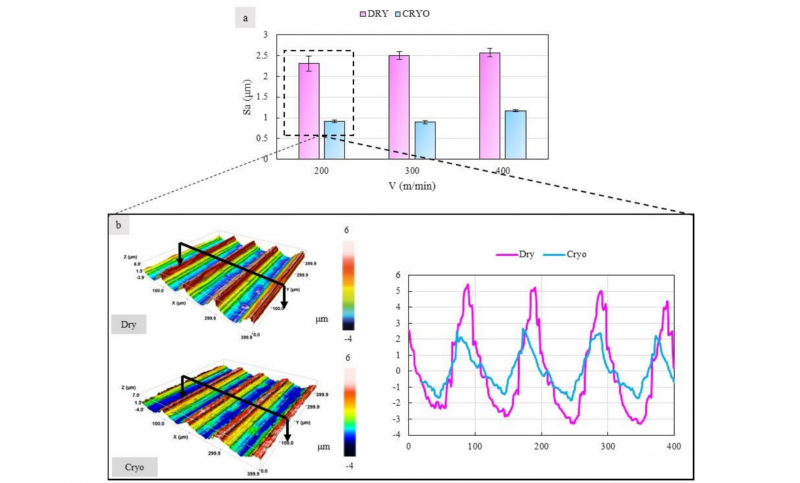
Fig. 4a reports the machined surface roughness as a function of the cutting speed and cooling condition. Regardless of the cutting condition, the application of LN2 reduced Sa of 60 %, 61 % and 54 % compared to the dry cutting case at V=200 m/min, V=300 m/min and V=400 m/min, respectively. Fig. 4b shows the topographies relative to the surfaces machined at V=200 m/min under dry and cryogenic cooling conditions and their relative profile height. Higher peaks and deeper valleys distinguished the dry case, which contributed to drastically increase the Sa value.
Fig. 4. (a) Surface roughness as a function of the cutting speed and cooling condition, (b) topographies of the surfaces turned at V=200 m/min.
Table 2 reports Tm, Hm and Xc values for the investigated samples. The effect of the cutting process on Tm is negligible, since no significant deviations from the value of the material in the as-delivered condition were noted. Nevertheless, the cryogenic process slightly as well as the adoption of the lowest cutting speed increased the crystallinity value in correspondence of the surface with the respect to the dry case, as visible in Fig. 5a.
Table 2. Tm, Hm and Xc for the investigated samples.
Fig. 5. (a) Xc values and (b) SHORE D hardness for the investigated samples.
Fig. 5b reports the SHORE D hardness for the investigated samples. Cryogenic cooling promoted the formation of harder surfaces compared to the dry condition, with a maximum increase of 9 % in the case of V= 400 m/min. Such enhancement can be correlated to the crystallinity increase, since the latter characteristic positively affects the polymer mechanical properties [11].
3.2 Mechanical behavior
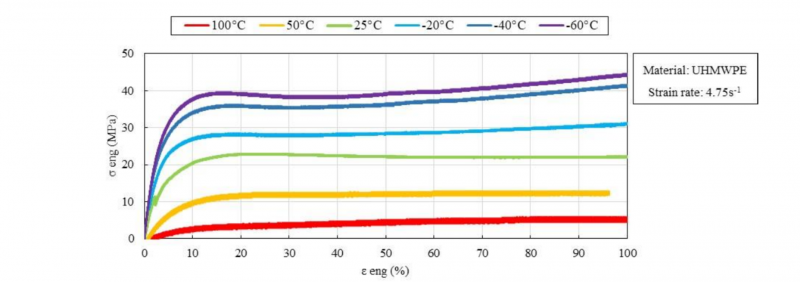
Fig.6 shows the engineering stress-strain curves at different temperatures. A drastic increase of the modulus of elasticity E and yield stress 𝜎y was found at decreasing testing temperature.
Fig. 6. Engineering stress-strain curves at varying temperature.
Table 3. E and 𝜎y at varying temperature.
The temperatures recorded during turning at a distance of approximately 1 mm form the cutting zone, settled to approximately 56 °C for the dry strategy and -50 °C for the cryogenic one. Thus, it can be assumed that the turning tests were always carried out above Tg, namely within the UHMWPE rubbery regime. Even if turning within the rubbery region may lead to unsatisfactory surface finish, as a consequence of the material too high ductility [11], nevertheless cryogenic cooling helped in preserving the material mechanical strength, thus assuring better machining performances.
4 Conclusions
The present study delt with the application of cryogenic cooling to machine UHMWPE, as an alternative to dry cutting. Turning tests were performed at different cutting speed and the cutting temperature was measured during the process. The surface finish after machining was evaluated in terms of surface roughness, crystallinity degree and hardness. Afterwards, tensile tests were carried out on UHMWPE at different temperatures, from -60 °C to 50 °C.
The main conclusions can be summarized as follows:
-
Cryogenic cooling allowed the formation of smoother surfaces compared to dry cutting, with a maximum improvement of 61 % at V=300 m/min.
-
Cryogenic cooling led to the formation of harder and less amorphous surfaces compared to dry cutting. The hardest and less amorphous surfaces were obtained at V=400 m/min with an increment of 9 % inhardness compared to the corresponding dry case.
-
It was shown that UHMWPE behaved in stiffer way at temperatures lower than zero compared to the ones above room temperature. This promoted easier cutting with a consequent improvement of the machined surface finish.


